# Team Office
# Team Office Overview
# Timesheet Settings
# Setup Kiosk App
## Summary
This tutorial covers how to set up the BuilderPal Kiosk App, enabling your crew to clock in and out from a shared device on the jobsite. It simplifies time tracking for teams, reducing the need for individual logins and ensuring accurate payroll data.
## Prerequisites
- Admin access to the Team Office.
- A shared device (such as a tablet) for the kiosk station.
- The BuilderPal Kiosk app downloaded from the App Store or Google Play.
- BuidlerPal Pro subscription.
## Steps
1. **Navigate to Timesheet Settings** — Go to your **Team Office** and select the **Timesheet Settings** page.

2. **Enable the Kiosk App** — Click **Enable Kiosk App** and ensure the BuilderPal Kiosk app is downloaded from the App Store or Google Play.

3. **Manage Kiosk Admins** — Click **Manage** next to **Manage Kiosk Admins** to add admins that can be linked to projects for crew clock-ins via the kiosk.

4. **Create a Kiosk Admin** — Click the **+** button in the top right, enter a name and password for the admin, then click **Save**.
5. **Assign Kiosk Admin to Project** — Add the Kiosk Admin to the project where the kiosk clock-in station will be set up.

6. **Sign In on Shared Device** — Sign in to the Kiosk Admin account on the shared device your crew will use for clocking in.

7. **Set Up Team Member Pins** — Navigate to the **Team Members** page in **Team Office** and set 4-digit login pins in each team member's profile.


8. **Log In with Pin** — Once pins are set, team members can log in to their clock-in page from the Kiosk Admin account.
## Confirmation
You'll know it's set up successfully when team members can enter their 4-digit pins on the shared device to access their clock-in page from the Kiosk Admin account.
## FAQ
**Q: Can I use the Kiosk App on multiple projects?**
**A:** Yes, assign the same Kiosk Admin to multiple projects in the Manage Kiosk Admins section.
**Q: What if a team member forgets their pin?**
**A:** Reset the 4-digit pin in their profile on the Team Members page in Team Office.
**Q: Does the Kiosk App require internet access?**
**A:** Yes, it needs a connection to sync clock-ins, but setup is done via the web interface.
**Q: Can I have multiple Kiosk Admins?**
**A:** Yes, create additional ones by clicking the + button in Manage Kiosk Admins and assign them to projects as needed.
## Related Articles
- Use the Kiosk App
- Clock In/Out
- Filter & Review Time Entries
- Use Supervisor Approval
- Time Report
# Setup Overtime
# Pro User Permissions
# Set Time Lock
# Reporting
# How to setup Payroll and run a report
## Summary
This tutorial guides you through configuring payroll settings and generating payroll reports in BuilderPal. Proper payroll setup ensures accurate tracking of team hours, compliance with payment schedules, and efficient financial management, reducing errors and supporting timely compensations for your team.
## How-To Video
## Prerequisites
- An active BuilderPal Pro account with administrative access.
- Relevant team roles such as Admin or Finance Manager.
- Submitted timesheets from team members for the reporting period.
## Steps
1. **Navigate to the Timesheet Settings section in BuilderPal.**

2. **Click Configure Payroll to select your pay period and start date, then click Save to apply the settings.**

3. **Navigate to the Payroll Report page, set the desired time period, and apply any necessary filters.**


4. **Click Export Report, select a format, and choose to preview or finalize; if finalizing, check Include past non-finalized entries as needed.**

5. **The exported report will download automatically; view finalized reports by clicking Finalized reports or the document icon in the top right.**
## Confirmation
Exported forms will automatically download. You can also view finalized reports by clicking "finalized reports" or clicking the document icon in the top right corner.
## FAQ
**What happens when I finalize a payroll report?**
Finalizing marks all included time entries as approved and paid, preventing them from being included in future reports to avoid duplicate payments.
**How can I include unpaid entries from past periods in a new report?**
Select the option to Include past non-finalized entries before exporting to pull in any outstanding entries from previous pay periods.
**Can I edit payroll settings after initial setup?**
Yes, return to Timesheet Settings and click Configure Payroll to update the pay period or start date as needed.
**Why might some time entries not appear in the report?**
Entries may be excluded if they fall outside the selected time period, have already been finalized in a previous report, or don't match applied filters.
**What report formats are available for export?**
Common formats include CSV, PDF, or Excel; select the one that best suits your payroll processing needs.
## Related Articles
- [How to approve timesheets](https://docs.builderpal.com/books/team-office/page/approve-time)
- [Roles & Permissions Overview](https://docs.builderpal.com/books/getting-started/page/roles-permissions-overview)
- [Setting up team members](https://docs.builderpal.com/books/team-office/page/create-team-members)
- [Generating time reports](https://docs.builderpal.com/books/team-office/page/generate-time-report)
**Upgrade to BuilderPal Pro** for this feature → https://www.builderpal.com/pro
# Approve Time
## Summary
This tutorial guides you through approving time entries in BuilderPal's Team Office. Accurate time approval ensures proper payroll processing, project cost tracking, and compliance with labor regulations.
## Prerequisites
- A BuilderPal account with one of the following roles: Admin, Team Project Manager, Team Finance Manager, or Team Supervisor.
- Time entries submitted by team members.
## Steps

1. **Navigate to the Time Approval page** — go to your Team Office in BuilderPal and select the Time Approval section.
2. **Apply filters to time entries** — use the filters at the top to narrow down by day, project, cost code, group, user, or approval status, then click **Generate** to refresh the list.



3. **Review the timesheets** — click the **edit** button to open and inspect the details of the selected entries.
4. **Approve the entries** — choose to approve individually or select **approve all** for the group of entries.
## Confirmation
The approved entries will update their status to approved in the list, making them ready for payroll export or further processing.
## FAQ
**What if I need to reject or edit a time entry?**
During review, you can edit details or choose not to approve if issues are found; unapproved entries remain pending for correction.
**Can I approve time for multiple projects at once?**
Yes, use the filters to include multiple projects before generating the list, then approve in bulk via **approve all**.
**What happens if no filters are applied?**
The full list of available time entries will display, but applying filters is recommended for focused reviews to avoid overload.
**How do I handle edge cases like overlapping time entries?**
The system may flag duplicates during review; edit as needed to resolve before approval.
**Who can see approved time entries?**
Approved entries are visible to admins and managers with payroll access, ensuring secure handling.
## Related Articles
- Enter Time as Employee
- Export Approved Time to Payroll
- Manage Cost Codes
- Assign Team Roles
- View Time Reports
**Upgrade to BuilderPal Pro** for this feature → https://www.builderpal.com/pro
# Generate Time Report
## Summary
This tutorial guides you through generating a time report in BuilderPal, including accessing the report, applying filters for date, project, or user, and exporting the details. This is essential for managers to track team hours, analyze productivity, and prepare payroll efficiently.
## How-To Video
## Prerequisites
- A BuilderPal account with access to Team Office.
- Relevant role such as Admin or Manager.
- Existing time entries in the system for the report to populate data.
## Steps
1. **Navigate to Team Office from the main dashboard.** — Click the Team Office icon or link on the main dashboard to access team management features.
2. **Go to the Timesheets section inside Team Office.** — Within Team Office, select the Timesheets option to view time tracking tools.
3. **Select the Time Report tab.** — Switch to the Time Report tab to display charts and data summaries of logged hours.
4. **Apply filters for date range, project, or user.** — Use the filter options to specify the date range, select specific projects or users, and refine the criteria as needed.
5. **Click Export to generate and download the report.** — Once filters are applied, click the Export button to download the detailed time report, typically as a PDF for payroll purposes.
## Confirmation
The report will download as a file (e.g., PDF), displaying detailed time entries, totals, and breakdowns based on your filters. Confirm by opening the file and verifying the data matches your selections.
## FAQ
**Q: What if no data appears in the Time Report?**
A: Ensure time entries have been logged for the selected filters. If none exist, the report will be empty—try broadening the date range or checking timesheet submissions.
**Q: Can I export the report in formats other than PDF?**
A: The primary export is PDF for payroll, but check for CSV or Excel options in the export menu if available for your subscription.
**Q: How do I filter for multiple users or projects?**
A: In the filters section, select multiple items from the dropdowns for users or projects to include them in the report.
**Q: Is the Time Report available on mobile?**
A: Yes, but for best viewing of charts and exports, use the desktop version of BuilderPal.
**Q: What roles can access the Time Report?**
A: Typically Admins and Managers; regular users may only see their own timesheets unless permissions are granted.
## Related Articles
- [How to Submit a Timesheet](https://docs.builderpal.com/how-to-submit-a-timesheet)
- [How to Approve Timesheets](https://docs.builderpal.com/how-to-approve-timesheets)
- [Understanding Time Tracking Charts](https://docs.builderpal.com/understanding-time-tracking-charts)
- [Managing Team Permissions](https://docs.builderpal.com/managing-team-permissions)
- [Exporting Reports in BuilderPal](https://docs.builderpal.com/exporting-reports-in-builderpal)
# Export Employee Data from QuickBooks Desktop for Import into BuilderPal
## Summary
This tutorial guides you through exporting employee data from QuickBooks Desktop as an IIF file, converting it to CSV, and verifying it for import into BuilderPal. This ensures seamless data transfer for team setup, avoiding errors in live environments.
## Prerequisites
- QuickBooks Desktop installed with access to your company file.
- Use a test or sample company file to prevent impacting live data.
- Microsoft Excel or a similar tool for converting IIF to CSV.
## Steps
1. **Open QuickBooks Desktop and load a test company file.** Go to **File > Open or Restore Company > Open a company file**, then select a sample file to avoid affecting real data.
2. **Access the export feature.** Navigate to **File > Utilities > Export > Lists to IIF Files**.
3. **Select the Employee list.** Check the **Employees** box and click **OK**. Save the file as employees.iif.
4. **Convert the IIF file to CSV.** Open the IIF file in Excel or a text editor, ensure fields like EmployeeID, FirstName, and LastName are present, then save as a CSV file.
5. **Verify the fields in the CSV.** Open the CSV in Excel and confirm required fields such as EmployeeID and SSN match BuilderPal's import structure; adjust headers if necessary.
6. **Test the import into your system.** Upload the CSV into BuilderPal, mapping EmployeeID to prevent duplicates.
7. **Validate the imported data.** Review records in BuilderPal to ensure names, addresses, and IDs imported correctly and align for syncing.
## Confirmation
The CSV file is successfully created and validated, with all employee records appearing correctly in BuilderPal without errors or duplicates.
## FAQ
**Why use a test company file?**
Testing prevents accidental changes to live payroll or employee data in QuickBooks.
**What if the IIF file doesn't open in Excel?**
IIF files are text-based; open them in Notepad first, copy the content, and paste into Excel for conversion.
**Can I export directly to CSV without IIF?**
QuickBooks Desktop exports lists to IIF by default; for CSV, use reports like Employee Contact List and export via Excel.
**What fields are essential for BuilderPal import?**
Key fields include EmployeeID, FirstName, LastName, Email, and Phone; ensure they match to avoid import failures.
**How do I handle SSN or sensitive data?**
Mask or remove sensitive fields during testing; only include necessary data for BuilderPal.
## Related Articles
- [Create Team Members](https://docs.builderpal.com/create-team-members)
- [Invite Contacts](https://docs.builderpal.com/invite-contacts)
- [Edit Team Profile](https://docs.builderpal.com/edit-team-profile)
- [Manage People](https://docs.builderpal.com/manage-people)
- [Team & Company Settings](https://docs.builderpal.com/team-&-company-settings)
# Export Employee Data from Sage 50 Desktop
## Summary
This tutorial covers the process of exporting employee data from Sage 50 Desktop to a CSV file for integration with BuilderPal or other payroll and timesheet systems. This is useful for construction teams to sync employee details, time entries, and payroll information efficiently.
## Prerequisites
- Access to Sage 50 Desktop software.
- A sample company file for testing (to avoid modifying live data).
- A text editor (e.g., Notepad) for verifying the CSV file.
## Steps
1. **Open Sage 50 Desktop.** Use a sample company file (e.g., File > Open Company > Sample Company) to avoid modifying live data.
2. **Access Payroll Data Export.** Go to File > Data Export > Payroll Data Export.
3. **Select Employee Details.** Choose Employee Details and click Next. Select fields to export (e.g., EmployeeID, FirstName, LastName, Address, SSN, Phone, Email, HireDate).
4. **Save CSV File.** Click Browse to choose a save location, ensure "Include column headings" is checked, and save as a CSV file (e.g., employees.csv).
5. **Verify CSV.** Open the CSV in a text editor (not Excel, to avoid formatting issues) to confirm fields match your system’s requirements. Rename to sage.csv if importing into systems like BrightPay that require it.
6. **Test Import.** Import the CSV into your system, mapping EmployeeID to your system’s unique identifier to ensure proper syncing.
7. **Validate Data.** Check that records (e.g., names, IDs) imported correctly and align for future syncs with time entries or payroll.
## Confirmation
The exported CSV file will contain the selected employee fields and can be successfully imported into BuilderPal or other systems, with data matching the source records.
## FAQ
Q: Why is EmployeeID critical?
A: EmployeeID ensures accurate syncing with systems like BuilderPal for payroll or time tracking.
Q: Why test with demo data?
A: Using a sample company file verifies field compatibility without risking live data changes.
Q: Why avoid opening the CSV in Excel?
A: Excel may reformat sensitive fields like SSN or sort codes, leading to import errors in BuilderPal.
Q: What if I need more fields like PayRate or Department?
A: Select additional fields during the export step to customize the dataset for BuilderPal integration.
Q: How do I handle mid-year exports?
A: Export Employee Year-to-Date Figures separately via the same menu to include payroll balances in BuilderPal.
## Related Articles
- [Time Tracking](https://docs.builderpal.com/time-tracking)
- [Manage People](https://docs.builderpal.com/manage-people)
- [Team & Company Settings](https://docs.builderpal.com/team-and-company-settings)
- [Reporting](https://docs.builderpal.com/reporting)
- [Financial Settings](https://docs.builderpal.com/financial-settings)
# Team Settings
# Create Team Members
## Summary
This tutorial guides you through adding new team members to your BuilderPal account, either individually or by importing multiple at once. Adding team members is essential for collaborating on projects, assigning roles, and managing permissions effectively within your construction team.
## How-To Video
## Prerequisites
- You must have admin access or appropriate permissions to manage team members.
- Prepare team member details like name, email, phone, and desired roles/groups in advance.
## Steps

1. Navigate to the **Team Members** page in https://app.builderpal.com.

2. Select **Create Team Member** from the dropdown menu.

3. Fill out the new team member's information, including name, email, and phone.
4. Assign groups and permissions, then click **Save**.

5. Click **Save** to confirm and add the new team member.

6. To import multiple team members, select **Import Team Members** from the dropdown.

7. Select **Import Team Members** from the dropdown menu.

8. Write a message describing the team members you want to add, or upload a file with their info.

9. Optionally, upload a file containing team member details instead of typing a description.

10. Review and assign roles, verify information, then save the imported team members.

## Confirmation
The new team member(s) appear in the **Team Members** list, with an invitation email sent if applicable, and they can now access assigned projects based on their roles and permissions.
## FAQ
**Q: What if I don't assign a group or permission during creation?**
A: You can edit the team member's details later from the **Team Members** page to add or adjust groups and permissions.
**Q: Can I import team members without a file?**
A: Yes, by writing a descriptive message in the import field, BuilderPal will parse the details to pre-fill the information for review.
**Q: Why isn't the new team member receiving an invitation email?**
A: Ensure the email address is correct and check spam folders; invitations are sent automatically upon saving.
**Q: How do I remove a team member after adding them?**
A: From the **Team Members** page, select the member and choose the delete or deactivate option, as covered in related articles like Manage Team Member Permissions.
**Q: Are there limits on how many team members I can add?**
A: No limits on the free plan, but large imports may take longer to process; for bulk additions, use the file upload for efficiency.
## Related Articles
- Manage Team Member Permissions
- Create Groups
- Edit Company Profile
- Manage Contacts
- Time-tracking & Kiosk App Control Center
# Deleting a Team Member
## Summary
As a team admin in BuilderPal, you can easily remove individual team members from your team. This action revokes their access and removes them from the team roster. Note that BuilderPal does not charge per user—there is no cost associated with team member count. For full team deletion (removing the entire team, not just an individual member), contact support directly and request a full team deletion, our team will help you with this.
## Prerequisites
- You must have **Team Admin** role or be the primary account holder.
- Ensure you're logged in to the primary account with admin privileges.
- Back up any shared resources or data associated with the member before deletion.
## Steps
1. Navigate to **Team Office** from the main dashboard menu. !
2. Select **Team Members** to view the list of current team members. !
3. Click on the specific member you want to delete to open their profile details. !
4. Locate the **trash can** icon in the member's profile and click it to confirm deletion. !
## Confirmation
After deletion, the member will be immediately removed from the team list and lose access to shared BuilderPal resources. You can verify this by refreshing the **Team Members** page and confirming the user no longer appears.
## FAQ
**What happens to the deleted member's data?**
Deleted members lose access to team resources, but their personal BuilderPal account remains intact unless they are the primary holder.
**Can I undo a team member deletion?**
No, deletions are permanent. To re-add the member, invite them again via the **Team Members** add option.
**Who can delete team members?**
Only users with **Team Admin** role or the primary account holder have this permission.
**How do I delete the entire team?**
To delete your whole team (not just a single member), email support@builderpal.com from the primary account holder or a team admin account and request full team deletion.
**Does deleting a member affect billing?**
No, BuilderPal does not charge per user, so team member deletions have no impact on costs.
## Related Articles
- Add a New Team Member
- Manage Team Roles and Permissions
- Invite Collaborators to a Project
- Upgrade Your Team Plan
- Troubleshoot Team Access Issues
- Full Team Deletion Process
##
# Create Cost Codes & Divisions
## Summary
This tutorial guides you through setting up cost codes and divisions in BuilderPal, essential for organizing financial tracking, budgeting, and time entries in projects. Proper setup ensures accurate cost allocation, reporting, and compliance across your team.
## Prerequisites
- Access to the Company Back Office as an admin or finance role.
- Basic understanding of your company's cost structure.
## Steps
1. **Navigate to the Manage Cost Codes and Divisions page in your team office.**


2. **Click the plus button in the top right corner and select Add Division.**
3. **Enter the division code, display name, and description.**

4. **Click Select a Sector to browse and choose from a pre-loaded list of divisions if needed.**

5. **Click Save to add the division.**

6. **Select Add Cost Code from the plus button dropdown in the top right corner.**

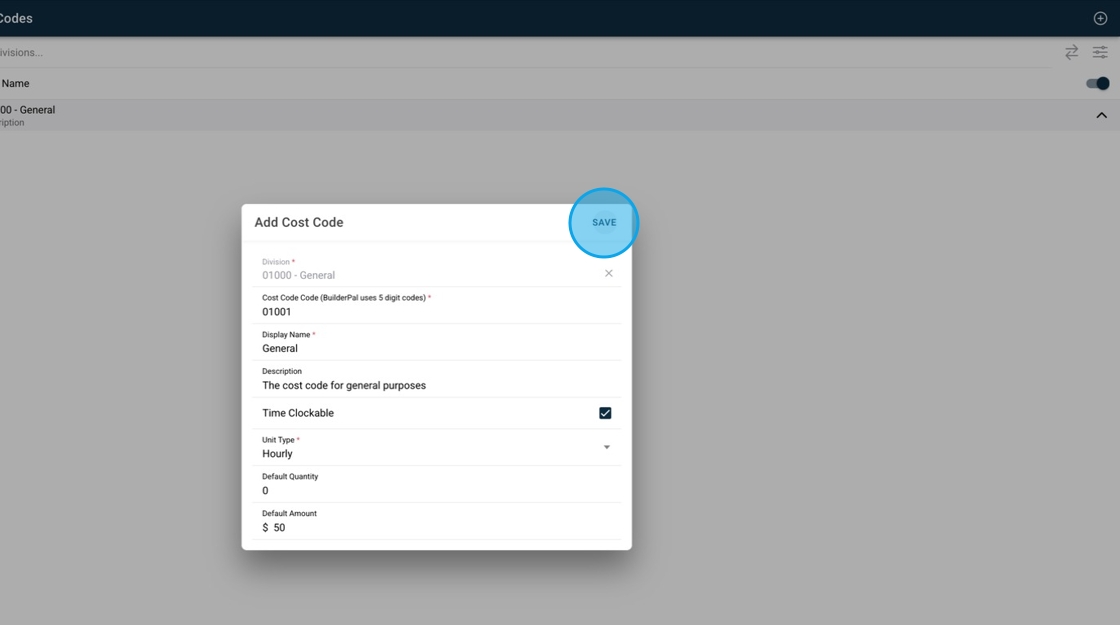
7. **Enter the cost code details, including code, display name, description, time clockable status, unit type, default quantity, default amount, and associated division.**

8. **Click Save to add the cost code.**
9. **Click Import divisions and cost codes as an alternative setup option.**

10. **Choose to import custom cost codes or BuilderPal's default set.**


11. **Click Import to complete the setup.**
## Confirmation
The new divisions and cost codes appear in the list on the Manage Cost Codes and Divisions page, ready for use in time entries, budgets, and reports.
## FAQ
**Q: Can I edit a cost code after saving it?**
A: Yes, click the edit icon next to the cost code in the list to update details like description or time clockable status.
**Q: What happens if I import BuilderPal's defaults?**
A: It populates standard divisions and codes based on common construction categories, which you can customize further.
**Q: Why can't I see the import option?**
A: Ensure you have admin or finance role access; if not visible, check your permissions in team settings.
**Q: Are cost codes required for time tracking?**
A: Yes, they help categorize hours accurately for reporting and budgeting in projects.
**Q: How do divisions group cost codes?**
A: Divisions act as categories (e.g., Electrical), organizing related cost codes for easier management and filtering.
## Related Articles
- Manage Taxes & Fees
- Generate Payroll Report
- Time-tracking & Kiosk App Control Center
- Edit Company Profile
- Create Team Members
# Team Member Import: Quick Guide (CSV, Excel, QuickBooks IIF)
#### What this does
- Quickly add multiple team members from a file.
- Works with CSV/TSV/TAB, Excel, and QuickBooks IIF employee exports.
- Uses headers‑only AI mapping: only your column names are analyzed to auto‑map fields. Your actual names, emails, and phone numbers stay on your device by default.
#### Before you start
- Make sure your file has a header row (the first non‑empty row should be column names like `First Name`, `Last Name`, `Email`).
- Include at least `First Name` and `Last Name`. `Email` is strongly recommended.
#### Supported file types
- CSV (`.csv`)
- TSV/TAB (`.tsv`, `.tab`)
- Excel (`.xlsx`, `.xls`)
- QuickBooks IIF (`.iif`) — Employee section only
---
### Importing Team Members (Step‑by‑Step)
1) Open Team Members → Import
- Go to the Team Members area in the app and click Import.
2) Upload your file
- Choose a `.csv`, `.tsv`, `.xlsx`, `.xls`, or `.iif` file.
3) Review the auto‑mapping
- If a mapping screen appears, confirm that columns like `First Name`, `Last Name`, `Email`, `Phone`, `Employee ID` are correctly matched. Adjust if needed.
4) Check the preview grid
- You’ll see each person in a grid with columns like First, Last, Email, Username, ID, Phone, and Roles.
- New rows are pre‑selected to be saved. You can uncheck any you don’t want to import.
5) Edit or add people
- Use the Edit action to fix a row (names, email, phone, etc.).
- Use Add Team Member to create a row manually if needed.
6) Assign groups/roles (optional)
- Click the people icon in the Roles column to assign groups and roles.
7) Save
- Click Save Team Members. If any row conflicts (for example, `username`, `email`, or `phone` already in use), you’ll see inline warnings. Fix and save again.
---
### What gets imported
- First name and last name
- Email (used to contact the person)
- Phone (digits normalized; one number per person)
- Employee ID (optional)
- Username (auto‑created if missing; see below)
- Groups and roles (optional; you can assign them during review)
Notes:
- The default password is `Password123` if one isn’t provided.
- You can edit any field before saving.
#### How usernames are created
- If `Email` is present: we use the part before `@` (ignoring any `+tag`). Example: `michael+brad@builderpal.com` → `michael`.
- If there’s no email: we derive `first.last`, lowercase and cleaned (e.g., `Brad Marchand` → `brad.marchand`).
- If duplicates appear in the same upload, a number may be appended to keep them unique.
---
### Using QuickBooks IIF (Employee list)
- The importer reads the Employee section: it looks for a header line starting with `!EMP` and then reads the following `EMP` lines.
- Typical IIF columns it recognizes: `EMAIL` (email), `PHONE1`/`PHONE2` (phone), `REFNUM` or `EMPNO` (employee ID), plus `FIRSTNAME` and `LASTNAME`.
Example IIF snippet:
```
!EMP NAME REFNUM EMAIL PHONE1 FIRSTNAME LASTNAME
EMP Brad Marchand 87 michael+brad@builderpal.com (604) 613-2792 Brad Marchand
```
Tips for IIF imports:
- Make sure the file includes `!EMP` followed by `EMP` rows.
- Other IIF sections (like `!QBP EMPLOYEE`, `CUSTOMPI`) are ignored.
- If phone or email didn’t map, check the header names (e.g., `EMAIL`, `PHONE1`).
---
### Examples
Example CSV:
```csv
First Name,Last Name,Email,Phone,Employee ID
Brad,Marchand,michael+brad@builderpal.com,604-613-2792,87
```
What you’ll see in the grid (simplified):
```json
{
"first_name": "Brad",
"last_name": "Marchand",
"username": "michael",
"send_email_to": "michael+brad@builderpal.com",
"send_sms_to": "6046132792",
"employee_id": "87",
"groups": []
}
```
---
### Troubleshooting
- IIF file missing `!EMP`
- Re‑export your employees from QuickBooks Desktop and ensure the `!EMP` header and `EMP` lines are present.
- Could not detect a consistent delimiter (CSV/TSV)
- Re‑save as CSV (comma) or TSV (tab). Ensure the first non‑empty row has column names.
- Header row looks empty or wrong
- Check that your first non‑empty row contains clear headers like `First Name`, `Last Name`, `Email`.
- Multiple email or phone columns
- The importer uses the first recognizable match.
- Conflicts on save (username/email/phone in use)
- The row will show a warning. Edit the value or unselect the row and try again.
---
### Privacy at a glance
- Headers‑only by default: we send only your column labels to AI to figure out mapping.
- Your actual names, emails, and phone numbers are processed locally in BuilderPal by default.
---
### Quick checklist
- File type is supported (`.csv`, `.tsv`, `.xlsx`, `.xls`, or `.iif`).
- First non‑empty row has headers.
- Columns include `First Name`, `Last Name`, and ideally `Email` (plus `Phone`, `Employee ID` if you have them).
- For IIF, confirm the file includes `!EMP` and `EMP` rows.
- In the preview grid, review fields, assign roles if needed, and click Save Team Members.
# Contact Import Modal: Quick Guide (CSV, TSV, Excel)
### Contact Import Modal: Quick Guide (CSV, TSV, Excel)
#### What this does
- Quickly add many contacts from a file into BuilderPal.
- Uses headers‑only AI mapping: only your column names are analyzed to auto‑map fields. Your actual contact data stays local by default.
- This modal does not support QuickBooks IIF. Use CSV/TSV/TAB or Excel.
---
### Before you start
- Make sure your file’s first non‑empty row is a header row (e.g., `First Name`, `Last Name`, `Email`).
- Include at least `First Name` and `Last Name`. `Email` or `Phone` is recommended.
#### Supported file types
- CSV (`.csv`)
- TSV/TAB (`.tsv`, `.tab`)
- Delimited text (`.txt`) using comma, tab, semicolon, or pipe
- Excel (`.xlsx`, `.xls`)
Note: IIF is not supported for contacts. Use the Team Member Import for IIF (Employee) files.
---
### How to import (Step‑by‑Step)
1) Open Contacts → Import
- Go to the Contacts area and click Import.
2) Upload your file
- Choose a `.csv`, `.tsv`, `.txt`, `.xlsx`, or `.xls` file.
3) Review auto‑mapping (if shown)
- If a mapping screen appears, confirm the suggested column matches (e.g., `First Name` → `first_name`, `Email` → `emails`). Adjust if needed.
4) Review the preview grid
- Each row shows a contact with fields such as First, Last, Emails, Phones, Company, Title, and Notes.
- Rows are pre‑selected to import. Uncheck any you don’t want to save.
5) Edit or add contacts
- Use Edit to fix a row inline (names, emails, phones, etc.).
- You can also add a new contact manually if needed.
6) Save
- Click Save Contacts. If conflicts occur (for example, `email` or `phone` already in use), you’ll see inline warnings. Fix and save again.
---
### What gets imported
The grid uses these fields per contact:
- `first_name` (string)
- `last_name` (string)
- `nickname` (string, optional)
- `emails` (array of `{ type: string, email: string }`)
- `phones` (array of `{ type: string, phone: string, country_code: string | null }`)
- `company_name` (string, optional)
- `company_position` (string, optional)
- `notes` (string, optional)
Notes:
- Multiple emails/phones are supported via the `emails` and `phones` arrays. If your file has only one, it becomes the first element (type is inferred from the header when possible, e.g., `work`, `mobile`).
- Phone digits may be normalized during processing.
#### Common header names that auto‑map
- Names: `First Name`, `Firstname`, `Given Name` → `first_name`
- Names: `Last Name`, `Surname` → `last_name`
- Nickname: `Nickname`, `Preferred Name` → `nickname`
- Emails: `Email`, `Email Address`, `Work Email`, `Personal Email` → `emails`
- Phones: `Phone`, `Mobile`, `Cell`, `Work Phone`, `Home Phone` → `phones`
- Company: `Company`, `Organization` → `company_name`
- Title: `Title`, `Position`, `Role` → `company_position`
- Notes: `Notes`, `Comments` → `notes`
---
### Examples
Example CSV
```csv
First Name,Last Name,Email,Phone,Company,Title,Notes
Gabe,Dahl,gabe@example.com,(604) 613-2792,Gabe Renovations,Owner,Prefers text
Jane,Doe,jane@xyz.com,604-555-0199,XYZ Inc,Marketing Director,
```
How those rows appear to the importer (simplified)
```json
[
{
"first_name": "Gabe",
"last_name": "Dahl",
"emails": [ { "type": "work", "email": "gabe@example.com" } ],
"phones": [ { "type": "work", "phone": "(604) 613-2792", "country_code": null } ],
"company_name": "Gabe Renovations",
"company_position": "Owner",
"nickname": null,
"notes": "Prefers text"
},
{
"first_name": "Jane",
"last_name": "Doe",
"emails": [ { "type": "work", "email": "jane@xyz.com" } ],
"phones": [ { "type": "work", "phone": "604-555-0199", "country_code": null } ],
"company_name": "XYZ Inc",
"company_position": "Marketing Director",
"nickname": null,
"notes": ""
}
]
```
---
### Using the chat in the modal (optional)
- You can type instructions (e.g., “Please load this file and map headers”) and attach your CSV/TSV/Excel.
- The assistant only analyzes your header row to infer mapping by default; the actual contact values are processed locally.
- You can also paste small lists of contacts in plain text and let the assistant structure them for you.
Tip: The modal includes quick actions like “Fill Example Text” or “Load Example” to demo the format.
---
### Conflicts and error messages
On Save, you may see conflicts per row. The modal highlights the field and shows a message. Typical keys:
- `email` — email already in use or invalid
- `phone` — phone already in use or invalid
- `contact` — a general contact-level conflict (e.g., duplicate contact)
Unselect or edit conflicted rows and save again.
---
### Troubleshooting
- “Could not detect a consistent delimiter.”
- Re‑save as CSV (comma) or TSV (tab). Ensure the first non‑empty row contains headers.
- “Header row appears empty or malformed.”
- Confirm the first non‑empty row is the header row and has at least two columns.
- Email or phone didn’t map.
- Make sure headers are recognizable (e.g., `Email`, `Phone`, `Mobile`). Adjust mapping if prompted.
- Multiple email or phone columns.
- The importer will populate the `emails`/`phones` arrays. The first recognizable header becomes the first entry; additional matched headers may be added with inferred `type`.
---
### Privacy at a glance
- Headers‑only AI mapping by default: we send only your column labels to AI to figure out mapping.
- Your actual contact values (names, emails, phone numbers) are handled locally in BuilderPal by default.
---
### Quick checklist
- File type is supported (`.csv`, `.tsv`, `.txt`, `.xlsx`, `.xls`).
- First non‑empty row has clear headers (`First Name`, `Last Name`, `Email`, etc.).
- Columns include at least `First Name` and `Last Name`; ideally `Email` and/or `Phone`.
- Review the preview grid, make edits if needed, then click Save Contacts.
- Remember: IIF files are not supported in this modal.
# Create Groups
## Summary
This tutorial guides you through creating a group in BuilderPal to organize your team members efficiently. Groups enable quick tagging for assignments, communications, and permissions across projects, helping streamline collaboration and task management for larger teams.
## Prerequisites
- Access to the Company Back Office (available to Admins and select team roles).
- At least one team member added to your company.
## Steps
1. **Navigate to the Groups page.** Go to https://app.builderpal.com/company-back-office and select **Groups** from the Team & Company Settings section.
2. **Start creating a group.** Click **Create Group** or the plus icon in the top right corner to open the group setup dialog.


3. **Set up group details and add members.** Enter a name and description for the group, then use the search bar to select and add users; click **Save** to confirm.

4. **Review the new group.** Verify the group appears in your list, with members now tagged for easy reference.
## Confirmation
You can now view your group and group members will receive a tag.
## FAQ
**Q: Who can create groups in BuilderPal?**
**A:** Admins (GC, SUB, SHORTCUT) and roles like Team Project Manager, Team Finance Manager, and Team Business Manager have access via Company Back Office.
**Q: Can I add users who aren't yet team members?**
**A:** No, the search bar only shows existing team members; add them first using the Create Team Members workflow.
**Q: What happens if I don't add a description?**
**A:** The group will still save, but a description helps clarify its purpose for other users viewing the group list.
**Q: How do groups affect permissions?**
**A:** Groups simplify tagging but don't directly set permissions; manage those separately in Team Member Permissions.
**Q: Can I use groups across projects?**
**A:** Yes, groups are company-wide and can be tagged in any project for assignments or mentions.
## Related Articles
- Create Team Members
- Team Member Permissions
- Manage Contacts
- Edit Company Profile
- Time-tracking & Kiosk App Control Center
# Edit Team Profile
## Summary
This tutorial guides you through editing your team profile in BuilderPal, including updating company details, adding service areas, uploading images, and showcasing a portfolio. Keeping your profile current helps attract better job matches, improves team visibility, and ensures accurate contact information for collaborations.
## Prerequisites
- You must be logged in to your BuilderPal account at https://app.builderpal.com.
- Have admin or managerial access to the team profile.
- Prepare any images or portfolio items you want to upload in advance.
## Steps

1. **Go to the Company Back Office and click your team profile at the top of the My Team section to open it.**

2. **Click Edit in the top right corner, then update your team name, handle, overview, slogan, address, and contact details as needed.**
3. **Click Save to apply your changes to the profile details.**


4. **Click Add service areas, then select custom locations or use the recommended list to define your work availability.**

5. **Click the camera icon on the profile image to upload a new profile picture or team banner from your device.**

6. **Scroll to the portfolio section and add details or images of completed projects to highlight your work.**
## Confirmation
Your team profile updates will appear immediately in the Company Back Office and on public views like Job Connector listings. Refresh the page to confirm changes, such as the new name, images, or service areas displaying correctly.
## FAQ
**Why can't I see the Edit button on my team profile?**
You need admin-level access (like Admin (GC) or Team Project Manager). If it's missing, contact your team admin to adjust your permissions via the Team Members settings.
**What happens if I change my team handle?**
The handle updates your unique URL slug (e.g., @yournewhandle), but existing links may break. Notify connected users or subs, as it's visible in invitations and bids.
**Can I add multiple service areas?**
Yes, select as many as needed during setup or edits. This improves job matching in Job Connector but doesn't restrict project creation outside those areas.
**How do I remove a portfolio item after adding it?**
Click the edit icon next to the item in the portfolio section, then select delete. Confirm the action to remove it permanently from your profile.
**Is there a file size limit for profile images or banners?**
Uploads are limited to 5MB per image. Use JPEG or PNG formats for best results; larger files may fail to upload.
## Related Articles
- Sign up for BuilderPal
- Create a Business Profile
- Manage Your Service Area
- Edit Personal Profile
- Manage Contacts
- Create Team Members
# Invite Contacts
## Summary
This tutorial covers how to invite new contacts to connect with your team in BuilderPal, including adding details, sending invitations, and alternative import methods. Inviting contacts helps build your network for collaboration on projects, bids, and subcontracting.
## Prerequisites
- You must have one of the following roles: Admin (GC), Admin (SUB), Admin (SHORTCUT), Team Project Manager, Team Finance Manager, or Team Business Manager.
- Access to the Team Office in BuilderPal at https://app.builderpal.com.
## Steps


1. **Navigate to the Contacts page in Team Office.** Go to the Team Office section and select Contacts to manage or add new connections.
2. **Click the plus button to add a new contact.** Locate the **+** button in the top right corner and click it to open the new contact form.

3. **Fill out the contact and company information.** Enter the required details for the individual contact, including any associated company information in the provided fields.
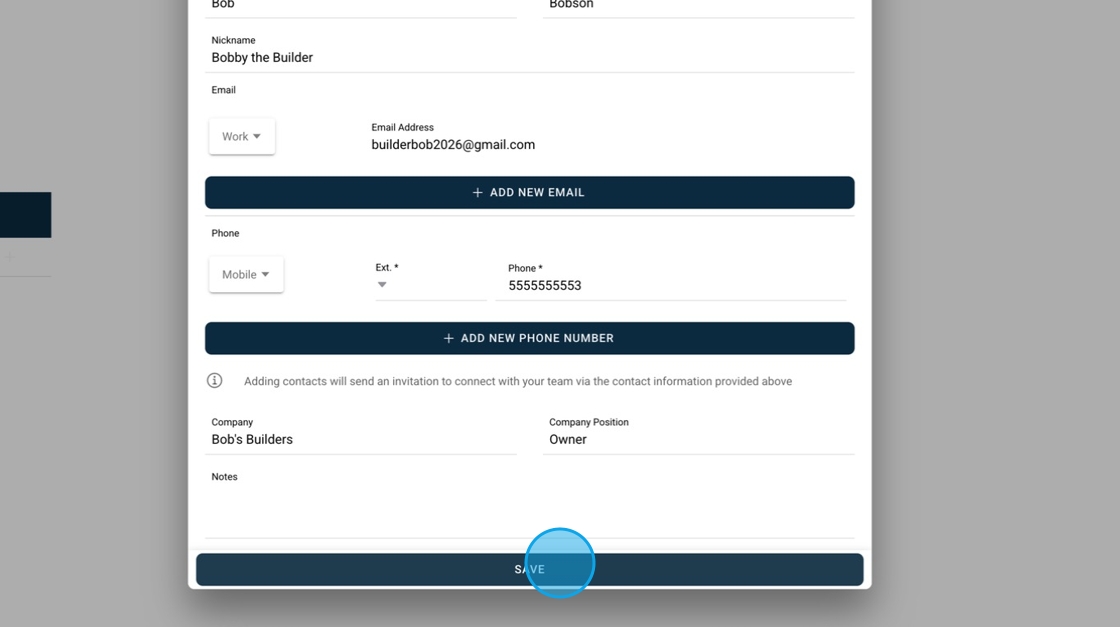
4. **Click Save to send the invitation.** Review the entered information, then click **Save** to finalize and send an invitation for the contact to connect with your team.

5. **Wait for the invited contact to accept the invitation.** The contact will receive a notification in their inbox; once accepted, the new team contact will appear in the Contacts page in Team Office.
6. **Import contacts using BuilderPal AI.** Alternatively, upload a file or describe contacts to the BuilderPal AI helper to import them into your contacts list.
## Confirmation
Once the invitation is sent and accepted, the new contact will be listed in your Contacts page in Team Office, ready for assignment to projects or bids. You'll see the updated contact list immediately after acceptance.
## FAQ
**Q: What if the contact doesn't receive the invitation?**
A: Check the email or phone number entered for accuracy. Invitations are sent via notification in BuilderPal; resend by editing the contact and saving again.
**Q: Can I invite multiple contacts at once?**
A: Yes, use the AI import method to upload a file with multiple contacts or describe them in bulk to the BuilderPal AI helper.
**Q: What happens if the contact declines the invitation?**
A: The contact won't appear in your list, but you can reinvite them by adding the contact again and saving.
**Q: Are there any limits on the number of contacts I can invite?**
A: No limits in the free plan, but ensure contacts align with your team's service areas for better matching.
**Q: How do I edit a contact after inviting?**
A: Go to the Contacts page, select the contact, make changes, and save to update details without resending the invitation.
## Related Articles
- Manage Contacts
- Create Team Members
- Invite Bidders
- Edit Team Profile
- Manage Connections
- Create Groups
# Manage Taxes & Fees
## Summary
This tutorial guides you through adding and configuring taxes and fees in BuilderPal, ensuring accurate cost tracking and budgeting for your construction projects without affecting profitability calculations incorrectly.
## Prerequisites
- You must have one of the following roles: **Admin (GC)**, **Admin (SUB)**, **Admin (SHORTCUT)**, **Team Project Manager**, **Team Finance Manager**, or **Team Business Manager**.
- Access to the **Team Office** in BuilderPal at https://app.builderpal.com.
## Steps

1. **Navigate to the Taxes & Fees page** — go to the **Team Office** and select **Taxes & Fees**.

2. **Add a new tax or fee** — click the **+** button in the top right corner.
3. **Enter the details** — fill in the name, abbreviation, and description for the tax or fee.

4. **Configure category and settings** — select the category (**Tax**, **Fee**, or **Other**), unit type (% or dollar amount), and default amount. The status starts as inactive until used in a cost item; archived taxes/fees cannot be used with new cost items.


5. **Set default options** — choose **Exclude from Budget** to hide it as a pass-through cost that doesn’t affect profit, and **On by Default** to apply it automatically to all new cost items.

6. **Save and verify** — click **Save**, then confirm by creating a new cost item in your project estimate and budget.
## Confirmation
You’ll know it worked when the tax or fee appears in your list, changes to active upon use in a cost item, and applies correctly without impacting budgets if excluded.
## FAQ
Q: Why is my tax or fee showing as inactive?
A: New taxes and fees start inactive and become active only after being used in at least one cost item.
Q: What happens if I archive a tax or fee?
A: Archived items cannot be applied to new cost items, but they remain on existing ones.
Q: How does "Exclude from Budget" affect my projects?
A: It treats the tax or fee as a pass-through cost, hiding it from budget calculations to avoid impacting profit margins.
Q: Can I edit a tax or fee after saving?
A: Yes, return to the Taxes & Fees page and click on the item to edit its details, but changes may not retroactively apply to existing cost items.
Q: What's the purpose of the abbreviation field?
A: The abbreviation provides a short code for quick reference in estimates, budgets, and reports.
## Related Articles
- Manage Cost Codes
- Create a Budget
- Finance Center Overview
- Edit Project Budget
- Budget Report
# Manage Service Areas
# Adjust Team Timezone
# Manage Team Member Permissions
# Forms
# Generate Form With AI