Mobile & App Basics
- Download the Mobile App
- Mobile vs Web: What’s the Difference?
- How to Navigate the Mobile App in BuilderPal
Download the Mobile App
Summary
The BuilderPal mobile app gives you all the power of the desktop platform, optimized for fast, simple, on-site work. You can access your projects, clock in and out, upload photos, communicate with your team, and receive instant notifications — all from your phone.
Whether you're a supervisor, tradesperson, or business owner, you can download the app and sign in using the same email and password you use on desktop.
Prerequisites
- An iOS or Android device
Steps
-
Download for iPhone (iOS) — tap the link or search in the App Store, then install and open.
-
Download for Android — tap the link or search in the Google Play Store, then install and open.
-
Log in using your BuilderPal email and password.
Confirmation
Once logged in, confirm by accessing your projects and features like clocking in/out — the app is ready for use, mirroring desktop functionality optimized for mobile.
FAQ
What if I forget my password?
Reset it via the "Forgot Password" link on the login screen or desktop site.
Is the app available in my region?
BuilderPal app is available worldwide in the App Store and Google Play.
What are the minimum device requirements?
iOS 14 or later for iPhone; Android 8.0 or later.
Why can't I find the app in the store?
Ensure you're searching "BuilderPal" exactly; check your region's store availability or contact support.
Can I use the app without internet?
Some features like viewing cached data work offline, but uploads and updates require connection.
Related Articles
Mobile vs Web: What’s the Difference?
Summary
BuilderPal works on both mobile and web, and both versions contain the same features, projects, and data. The difference is how you navigate. Mobile is optimized for fast, field-ready workflows; desktop is optimized for office work, reviewing information, and setup tasks.
Why It Matters
Problem it solves: Contractors often switch between jobsite tools and office tools. Without understanding the differences, it can feel like one version is “missing” something or harder to use.
Benefit to contractors: BuilderPal’s design keeps field work extremely fast and office work highly organized—so teams can move between devices without losing context.
How It Works
Core Navigation Differences
Both platforms access the same information, but the layout is tailored to the user’s environment.
Mobile App (Field-Optimized)
-
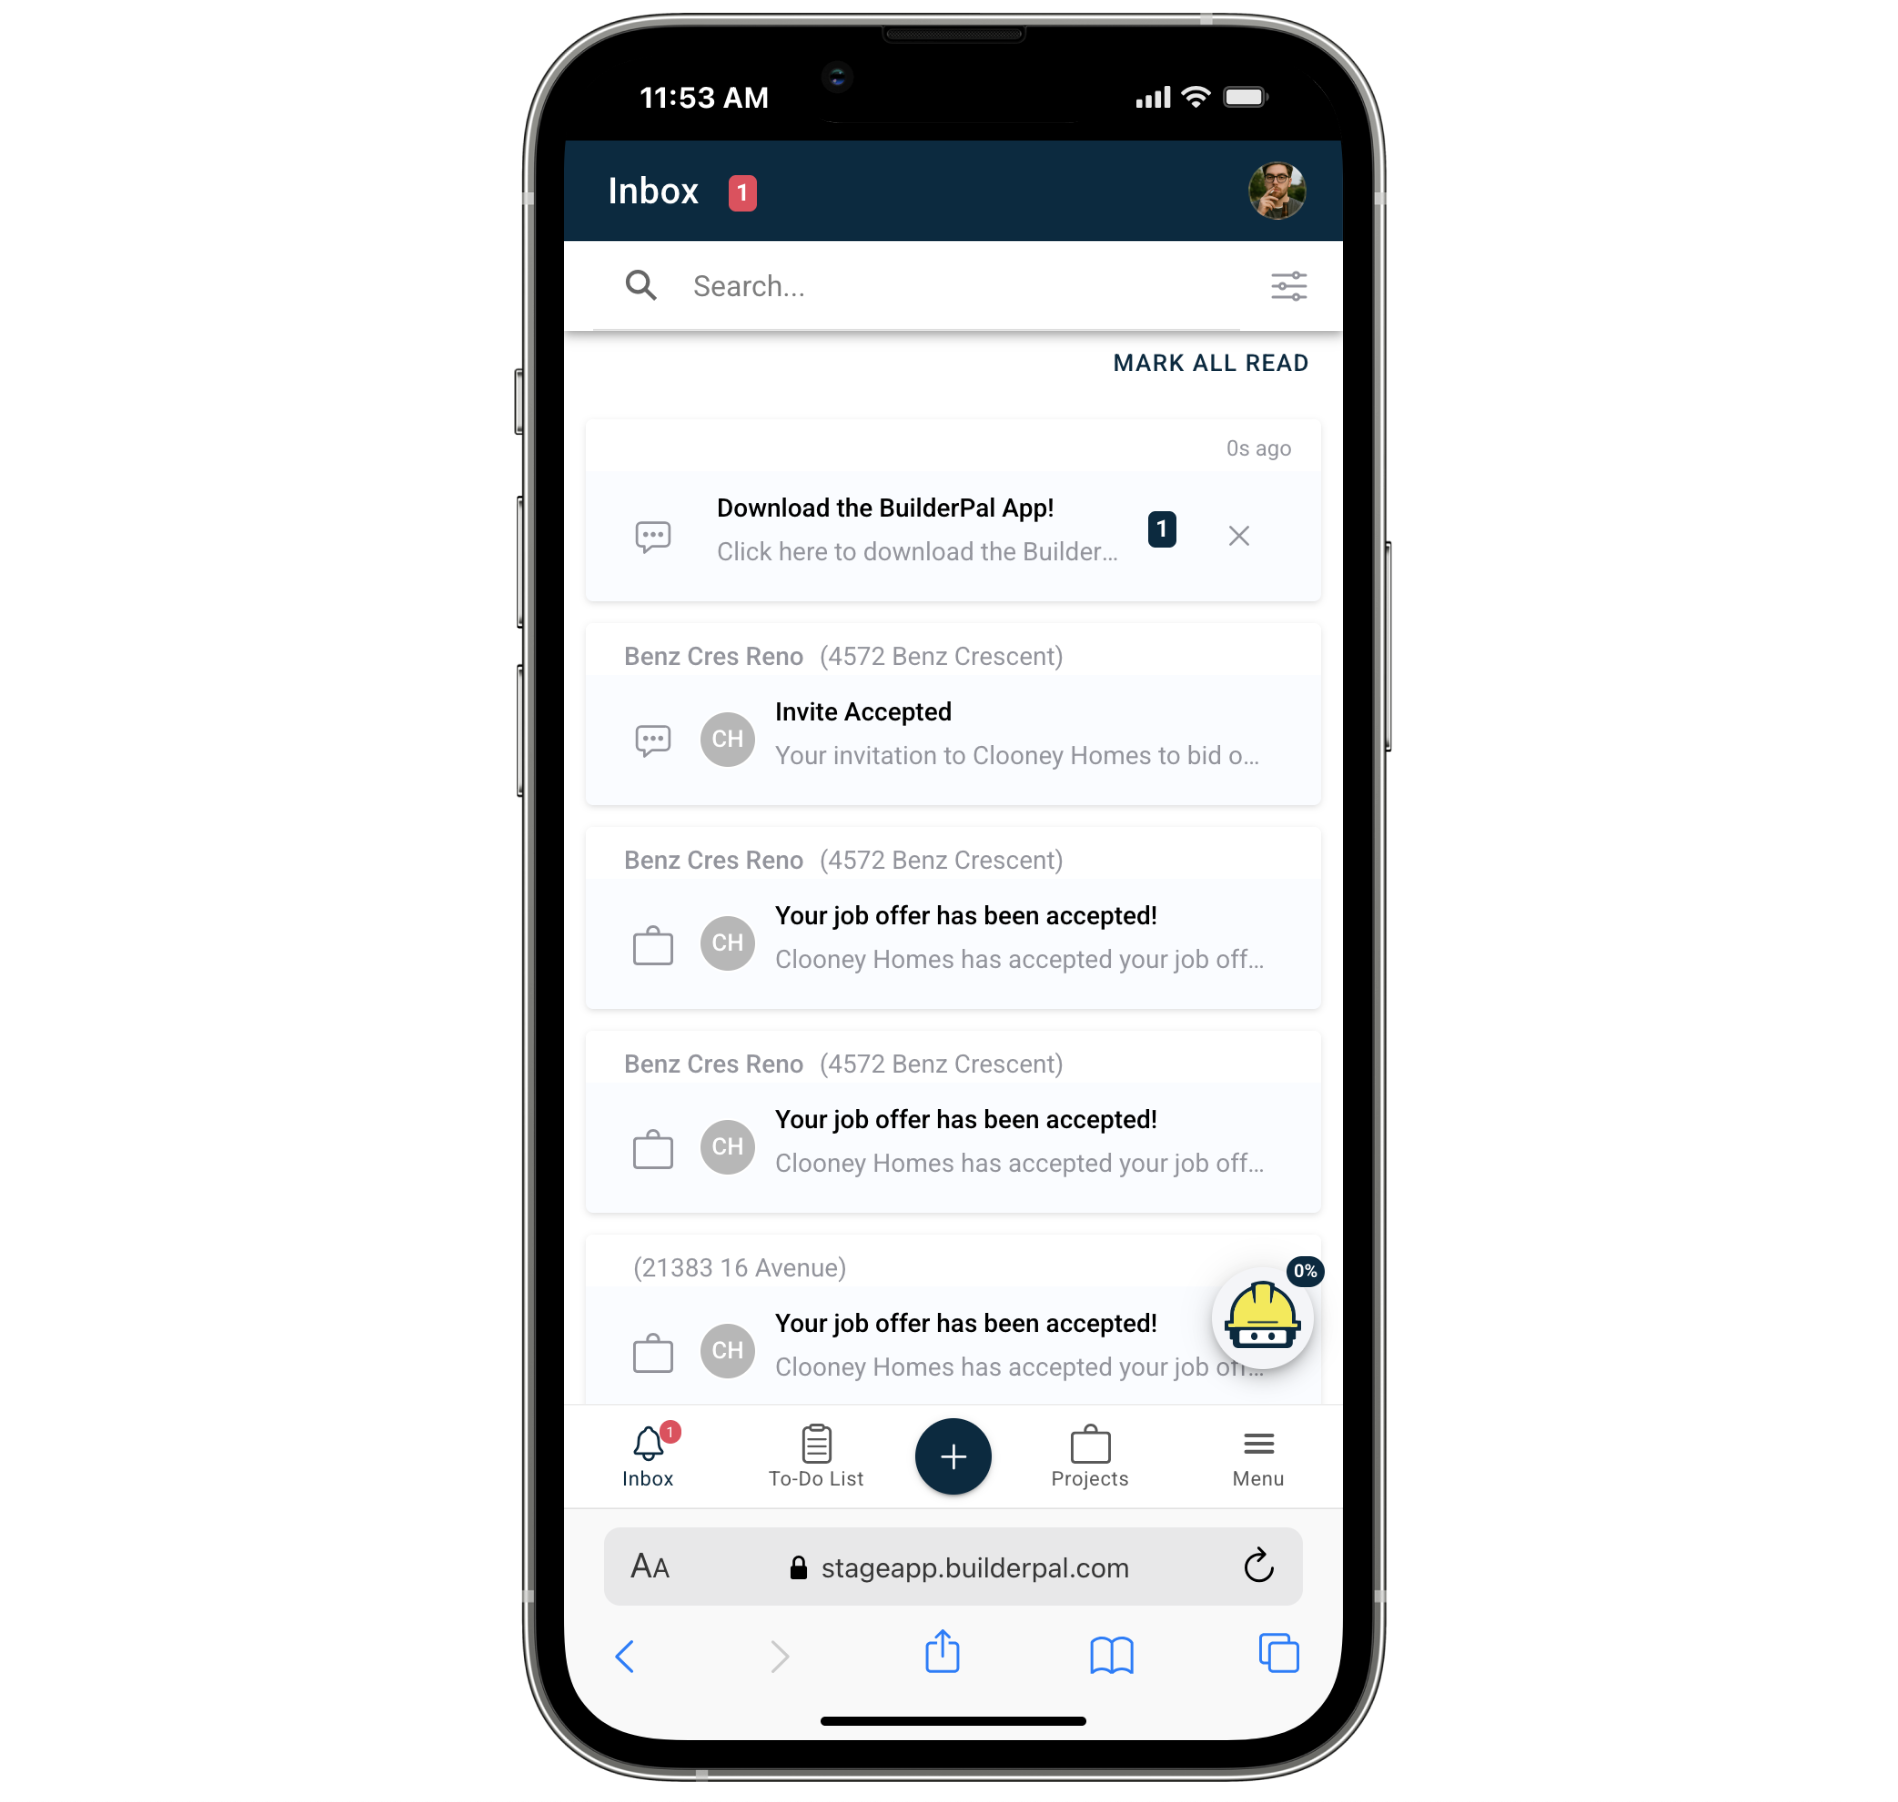
Home screen opens to the Inbox
-
Bottom navigation bar: Inbox, To-Do List, + (Quick Actions), Projects, Menu
-
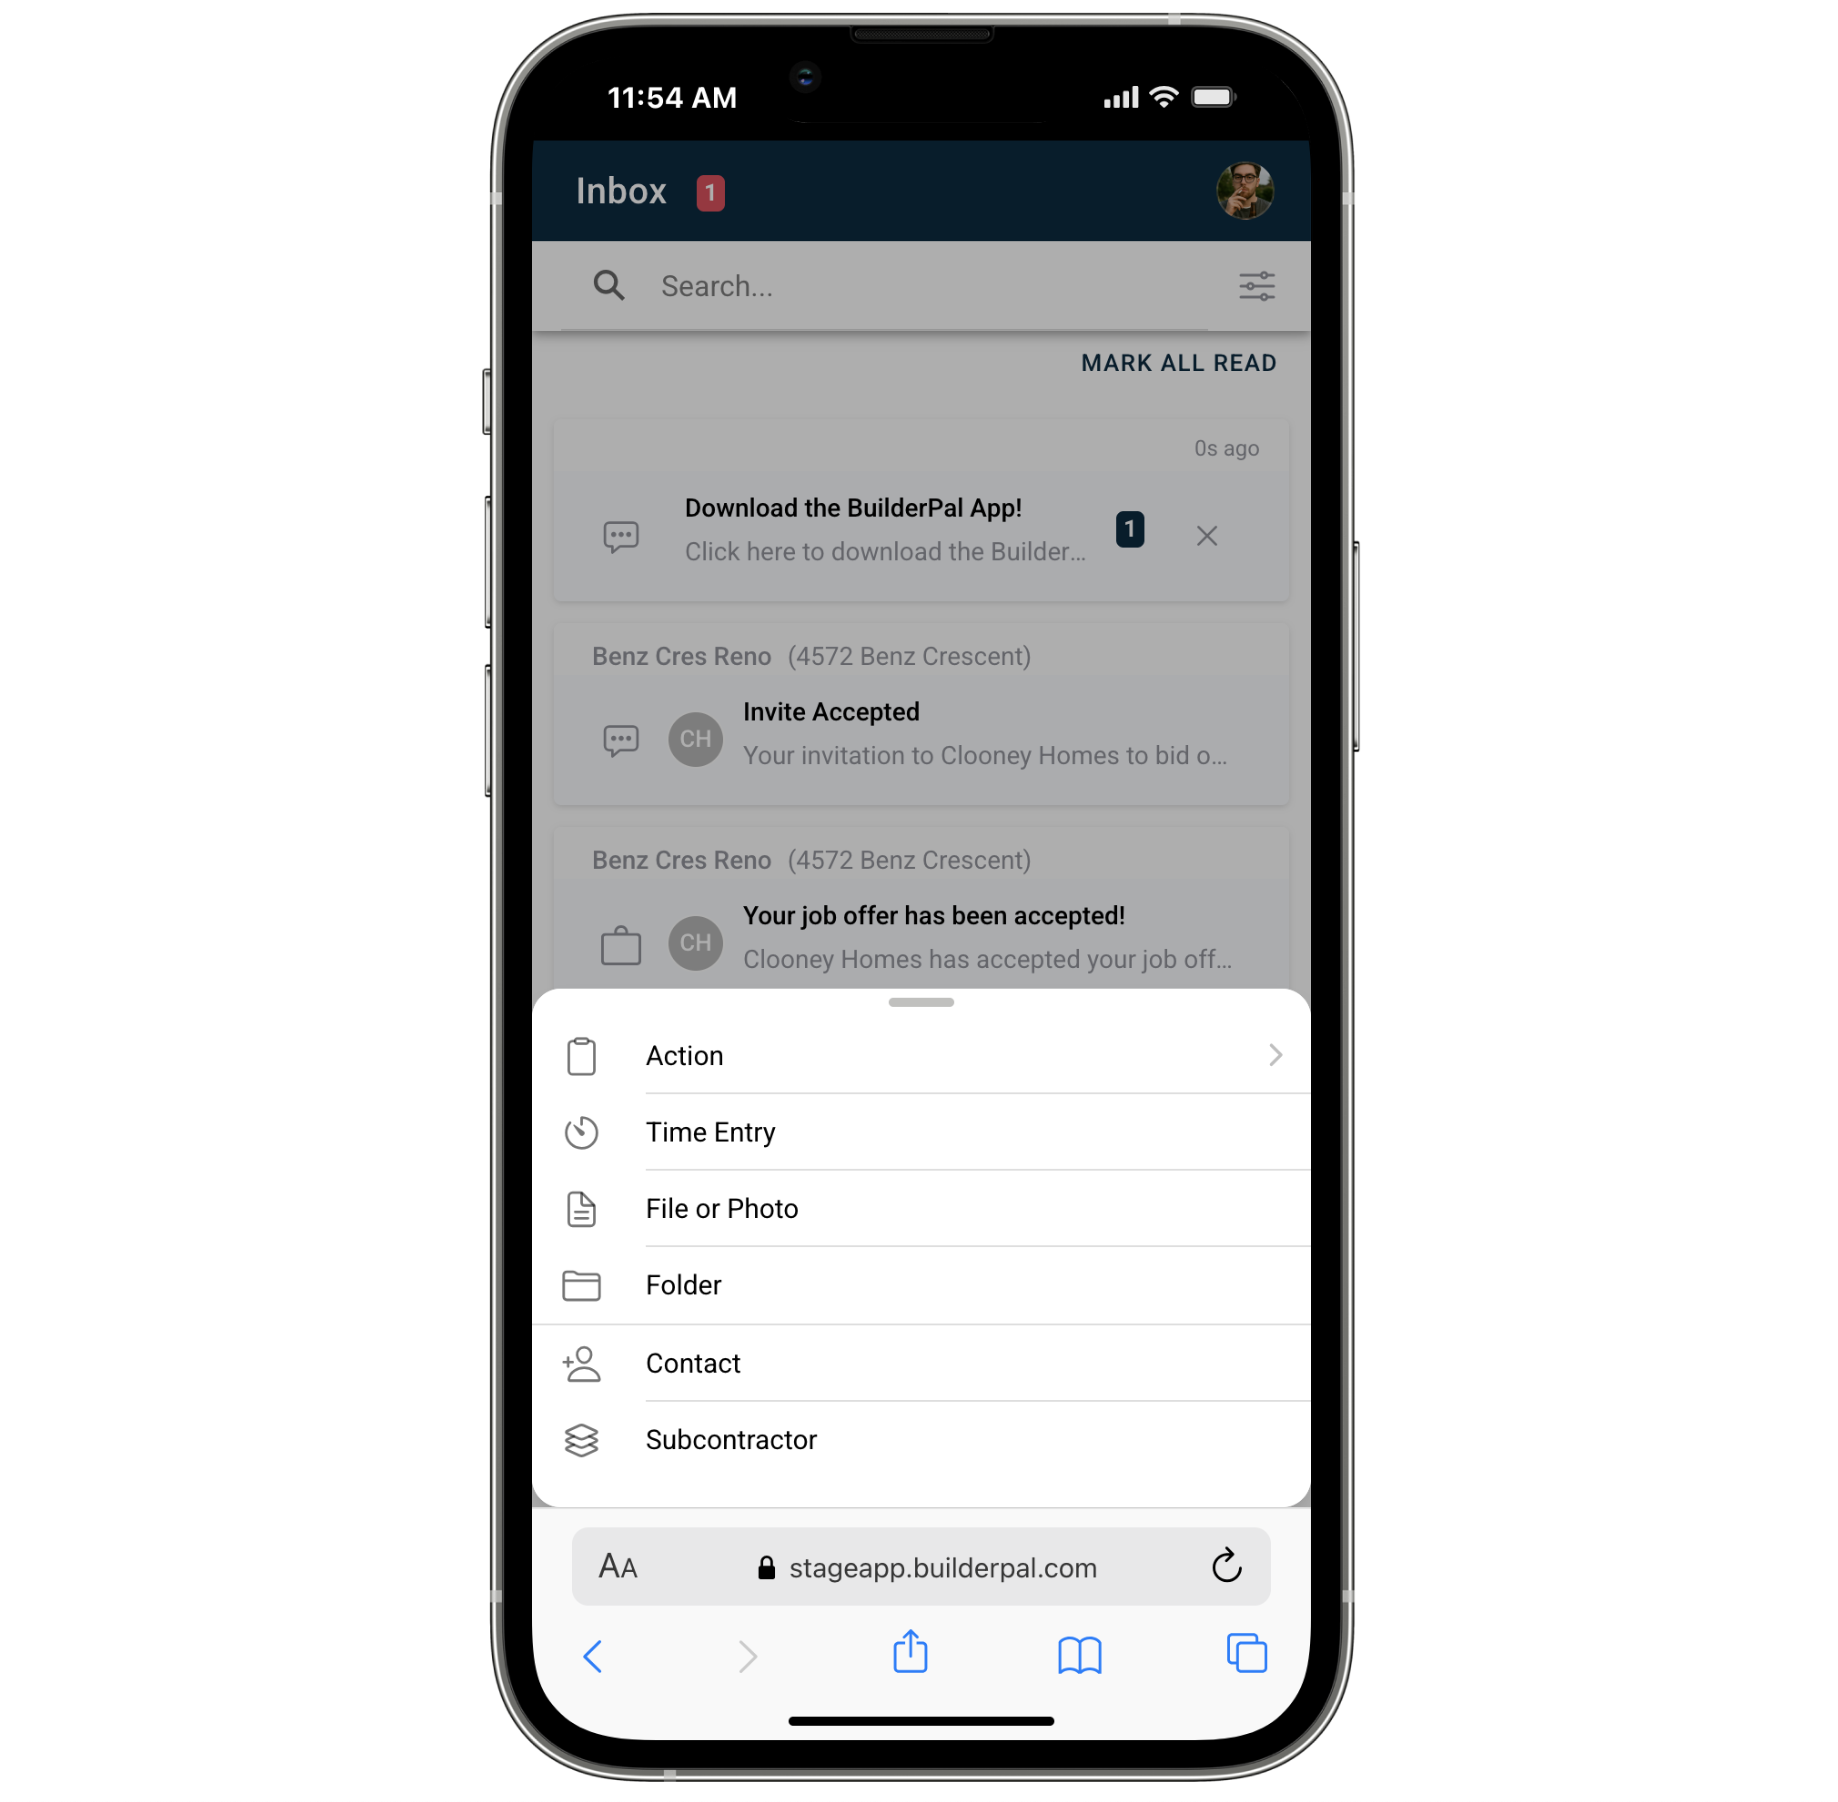
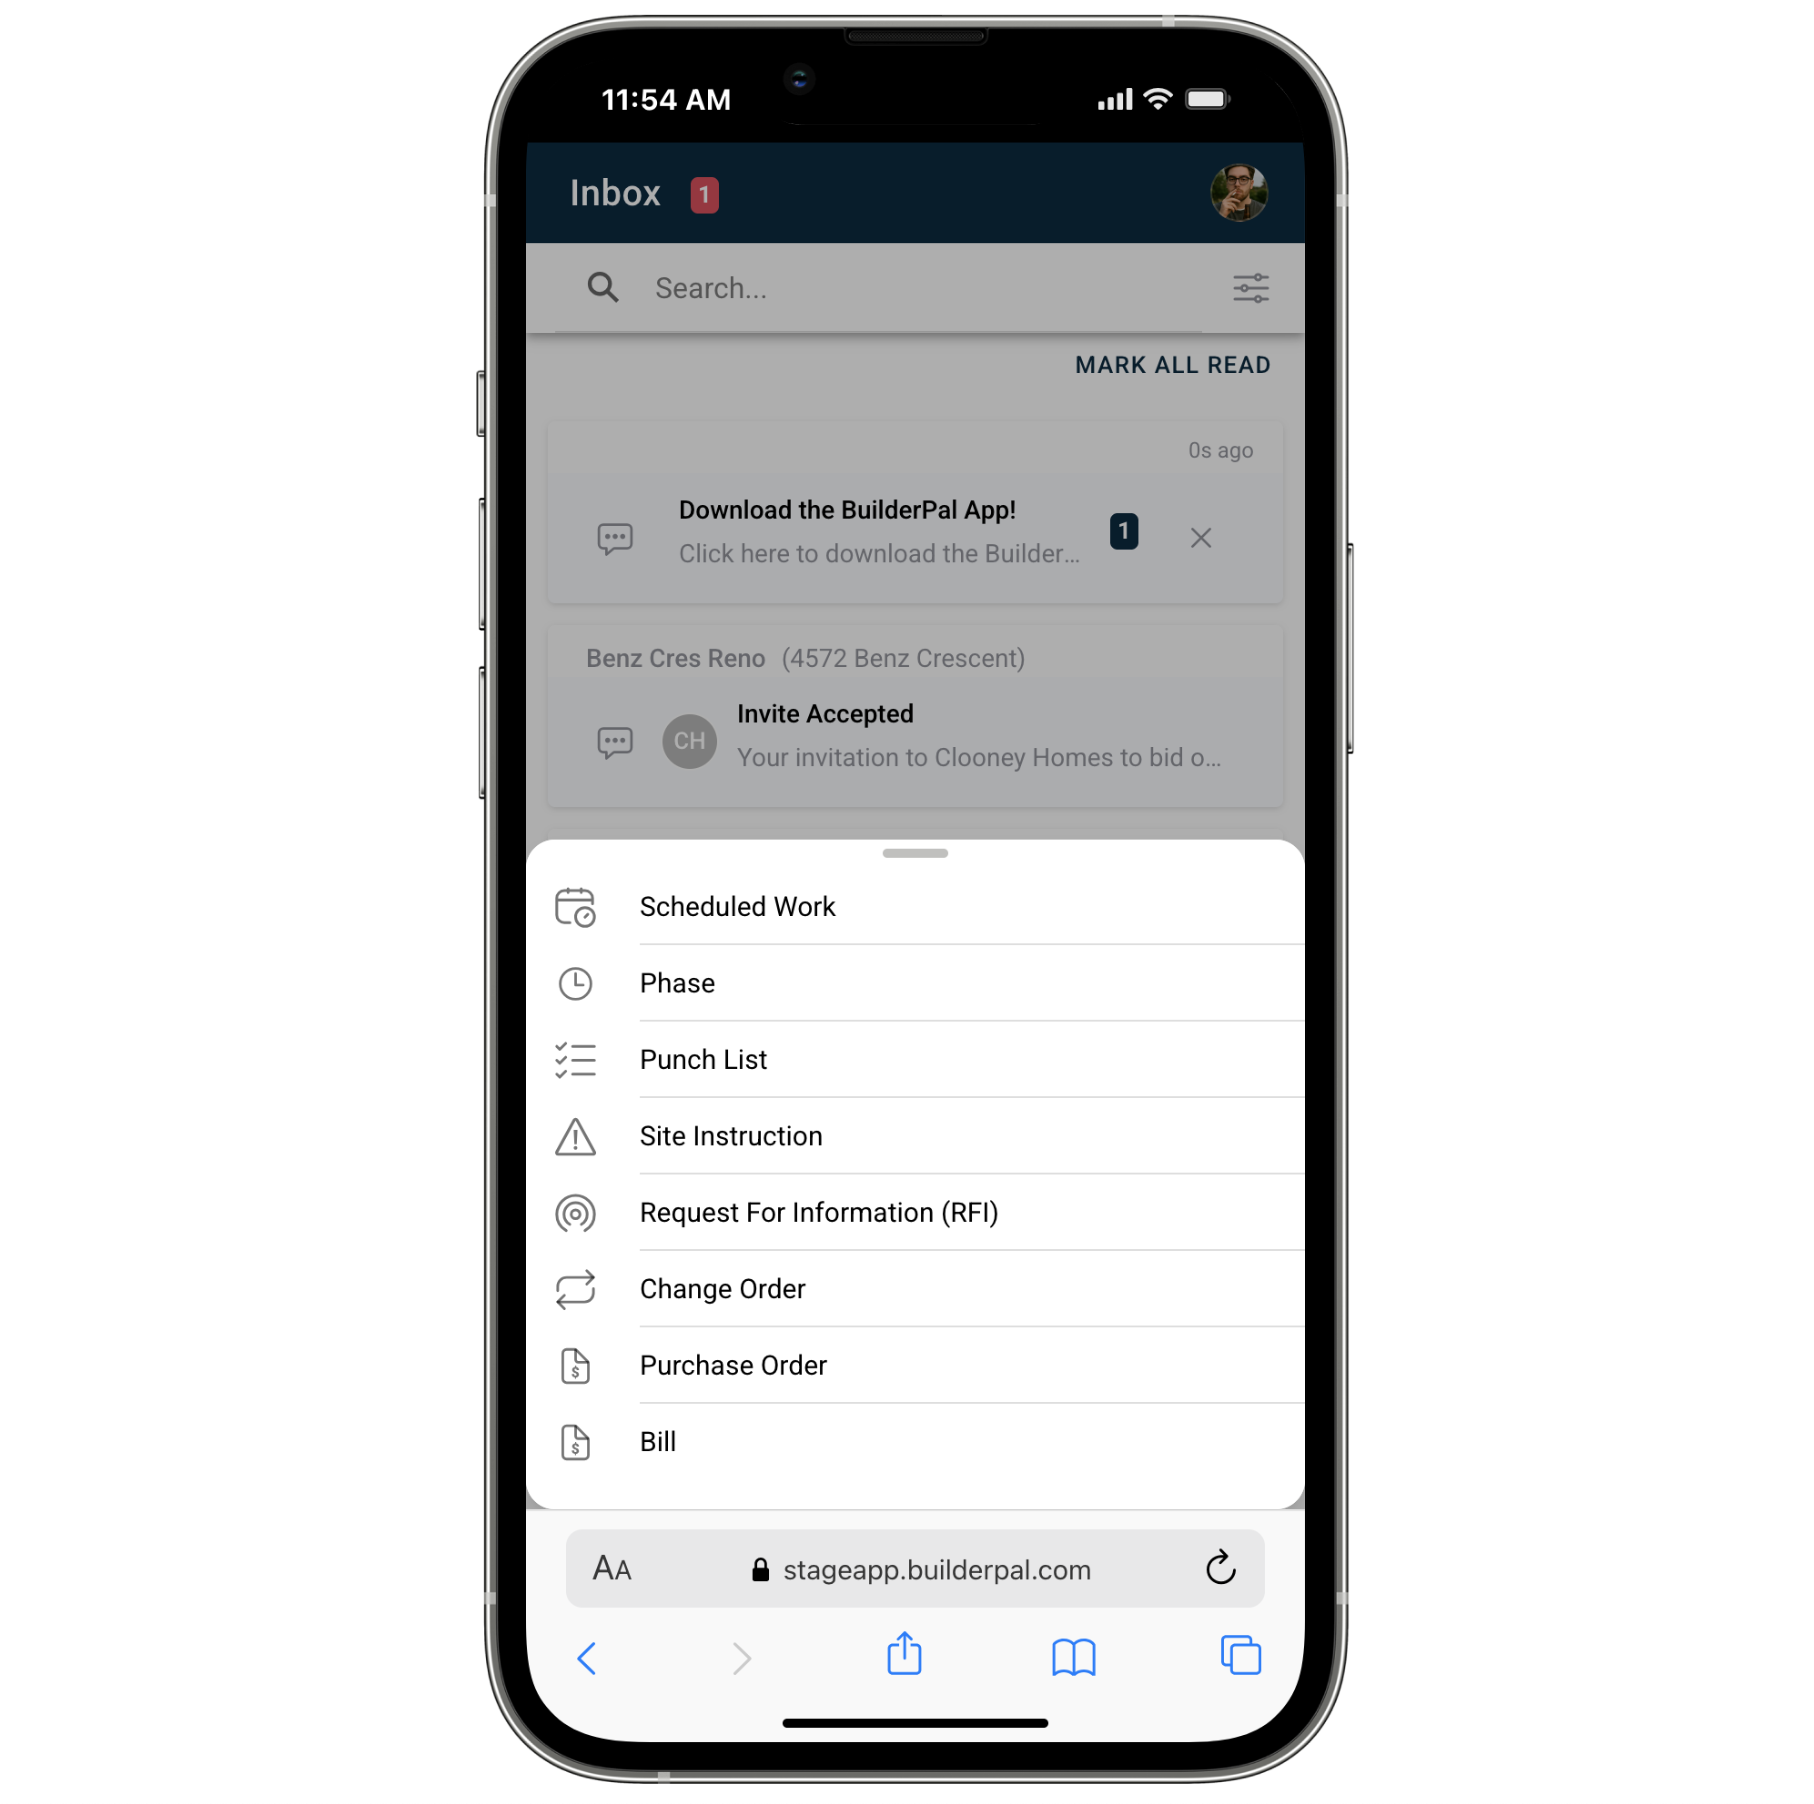
Quick Actions panel provides one-tap access to:
- Clock In/Out
- Job Connector
- Team Office
- Support
- Project tools (Overview, Schedule, Actions, Documents, Job Chat, Bidding, Subcontractors, Participants, Site Office)
Best for:
Web App (Office-Optimized)
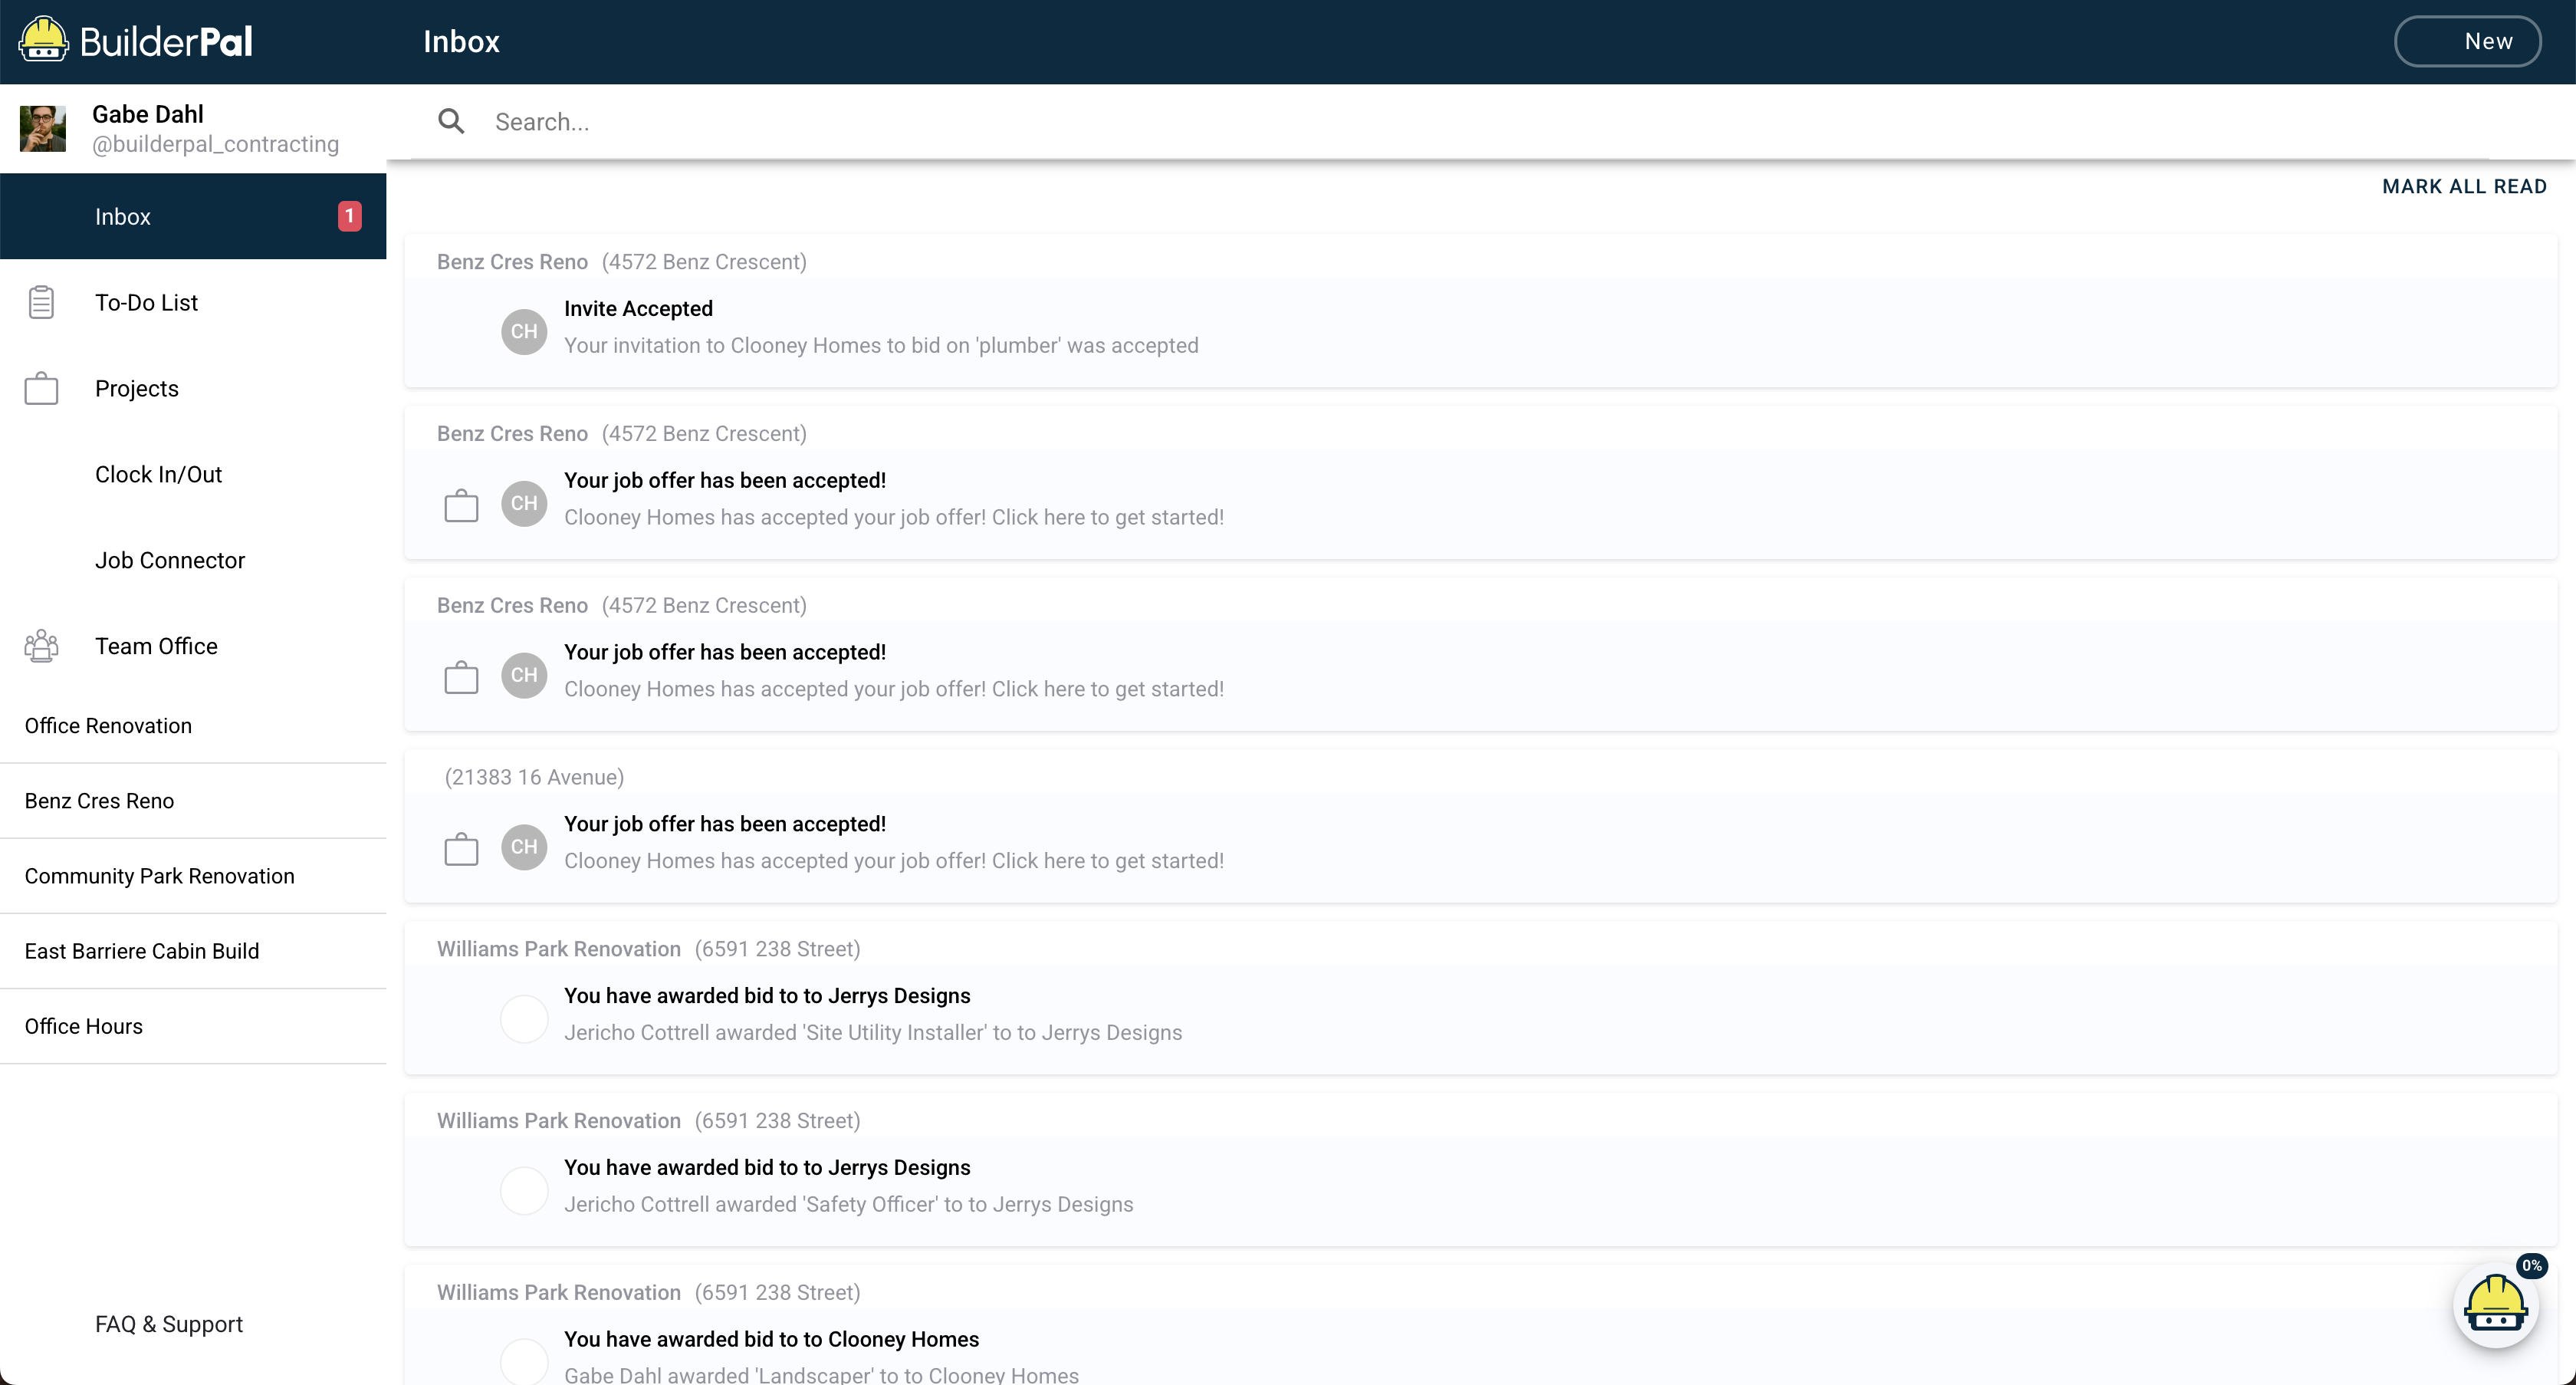
- Uses a left-hand sidebar for navigation
- Wider screen makes admin tasks, project setup, long lists, and reviews easier
- Ideal for GC admins, PMs, coordinators, and office teams
Best for:
- Reviewing schedules, documents, and long lists
- Detailed project setup
- Bid management
- Timesheet approvals
- Team and company-level settings
Real-World Example
On the jobsite: A supervisor clocks in, checks updates in the Inbox, opens the Quick Actions menu, and uploads photos to Documents—all from their phone.
In the office: A PM reviews yesterday’s activity, updates the schedule, edits subcontractor details, and reviews bid packages—all from the desktop sidebar.
When to Use Each
Use Mobile When…
- You’re physically on-site
- You need fast access to project tools
- You’re completing Actions or capturing jobsite conditions
- You’re clocking in or switching cost codes
- You’re responding to real-time updates
Use Web When…
- You’re setting up new projects or trades
- You’re reviewing or managing large sets of data
- You’re approving timesheets
- You’re updating documents or cost codes
- You’re doing managerial or administrative work
Next Steps
Related Articles
How to Navigate the Mobile App in BuilderPal
Summary
This guide walks you through the main areas of the BuilderPal mobile app so you know where everything is and how to move around quickly.
Prerequisites
Steps

1. Start on the Inbox (Home Screen)
This is the first screen you'll see after logging in. It shows updates from your projects.
Use the Inbox to:
- View activity across your projects
- Open invitations, approvals, messages, and updates
- Jump directly into a project or action by tapping any row
2. Use the Bottom Navigation Bar
The bottom bar is always visible and gives you access to the main parts of the app.
It includes:
- Inbox – Your main activity feed
- To-Do List – Tasks assigned to you
- + – Quick Actions panel
- Projects – List of all jobs you have access to
- Menu – Global tools + project tools
You’ll use these five buttons to get almost everywhere.
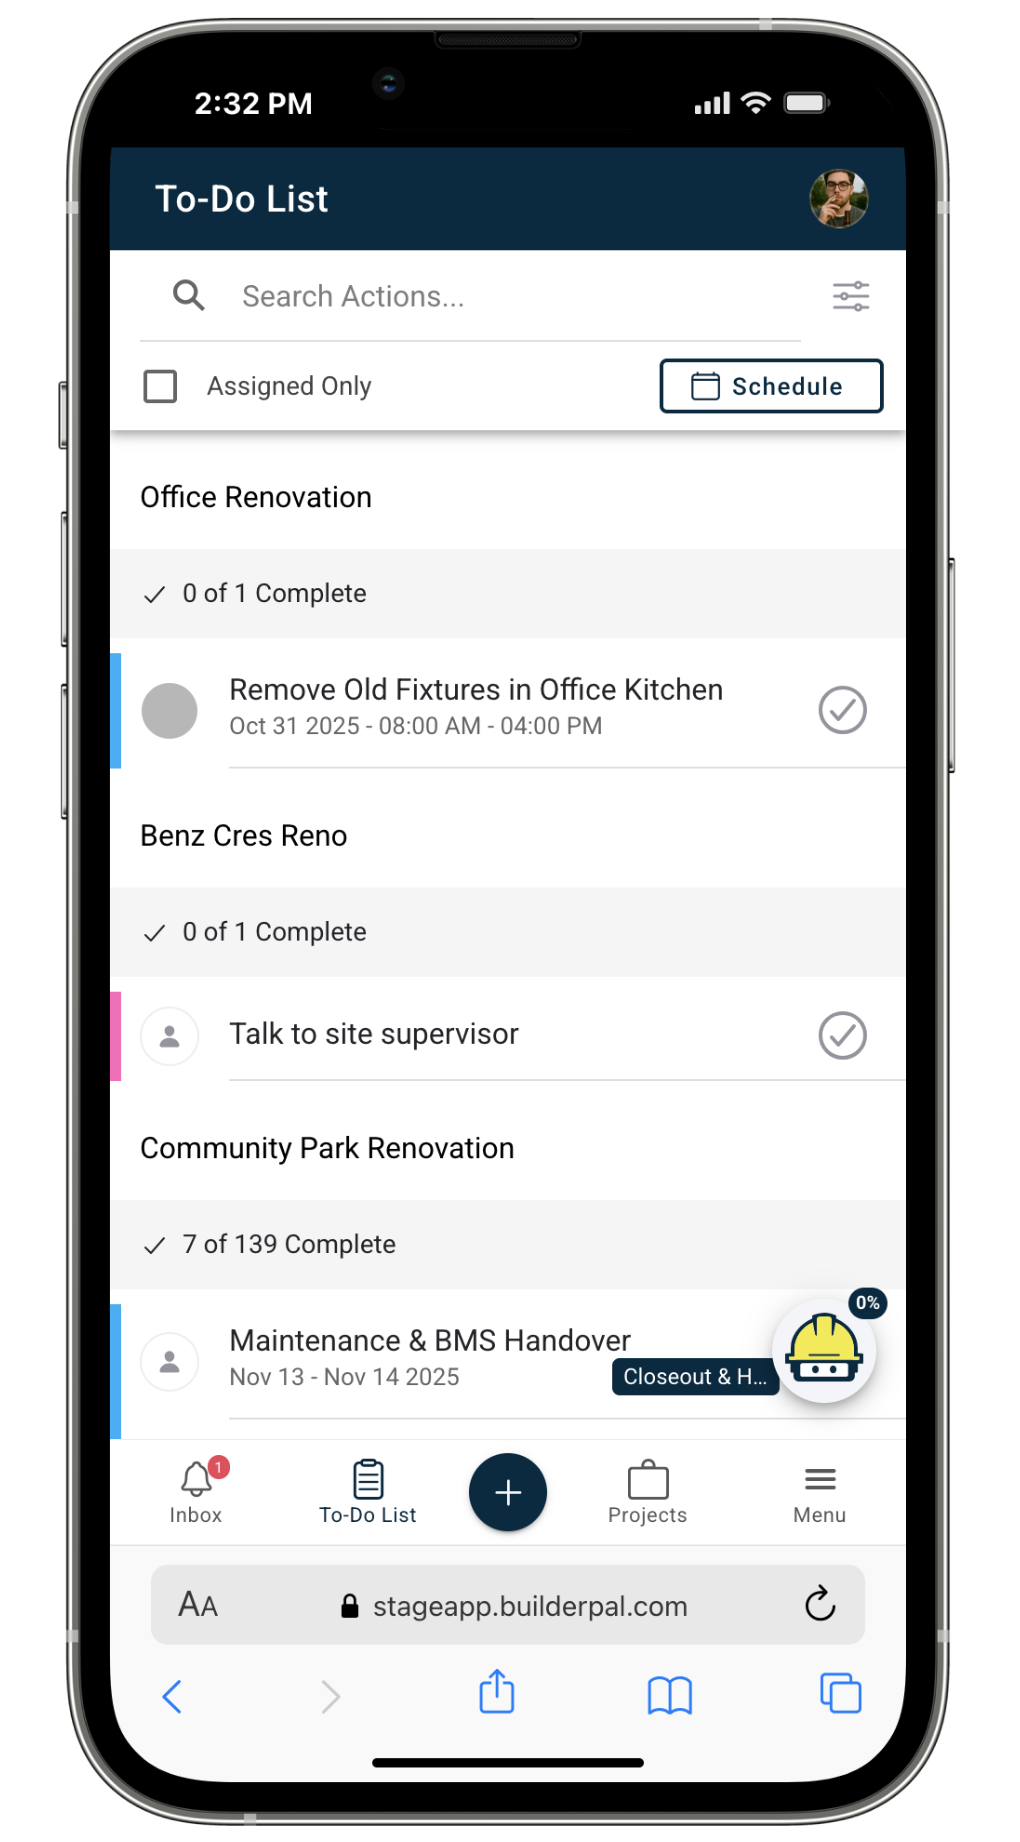
3. Open Your To-Do List
The To-Do List tab shows all personal tasks assigned to you.
You can:
- View everything you need to complete
- Tap a task to open its details
- Jump into the related project or action
4. Browse Your Projects
Tap Projects to open your full project list.
From here, you can:
- Scroll through all projects
- Tap any project to open it
- Use the + Quick Actions menu to open that project’s tools
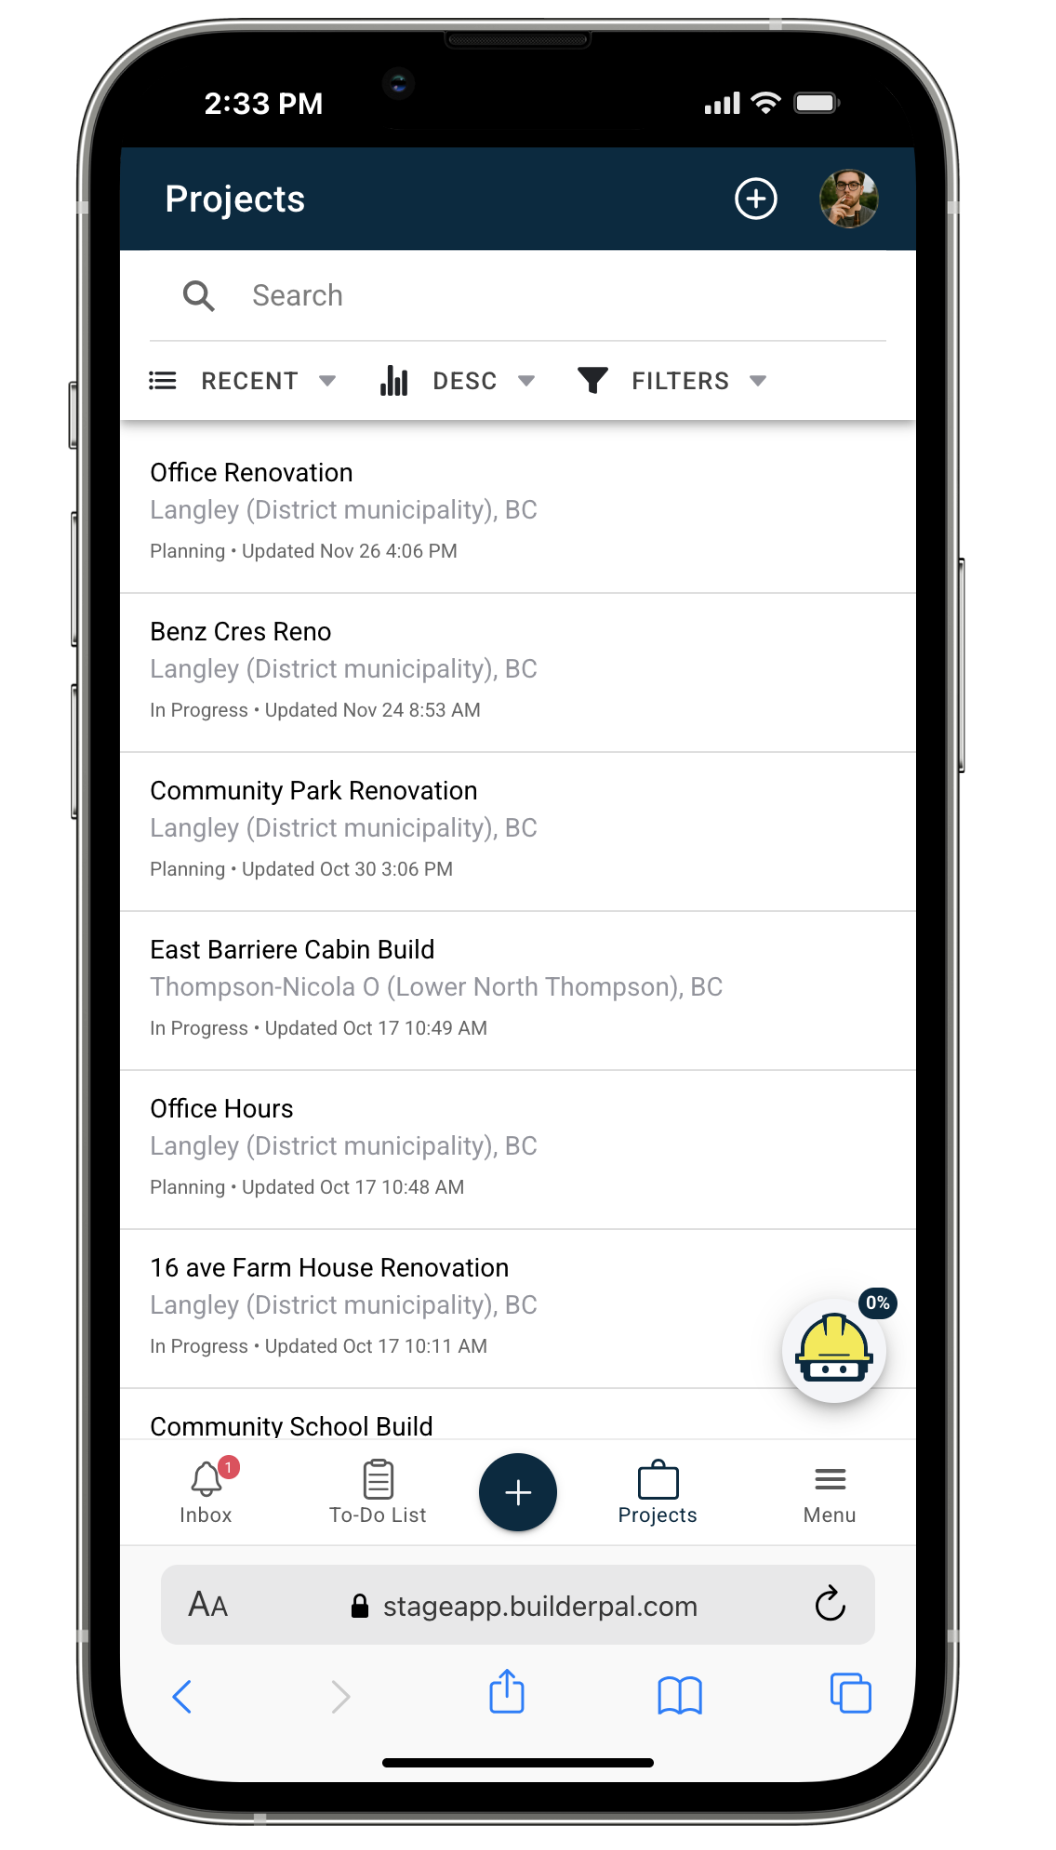
Once a project is selected, it will appear automatically inside the Quick Actions panel.
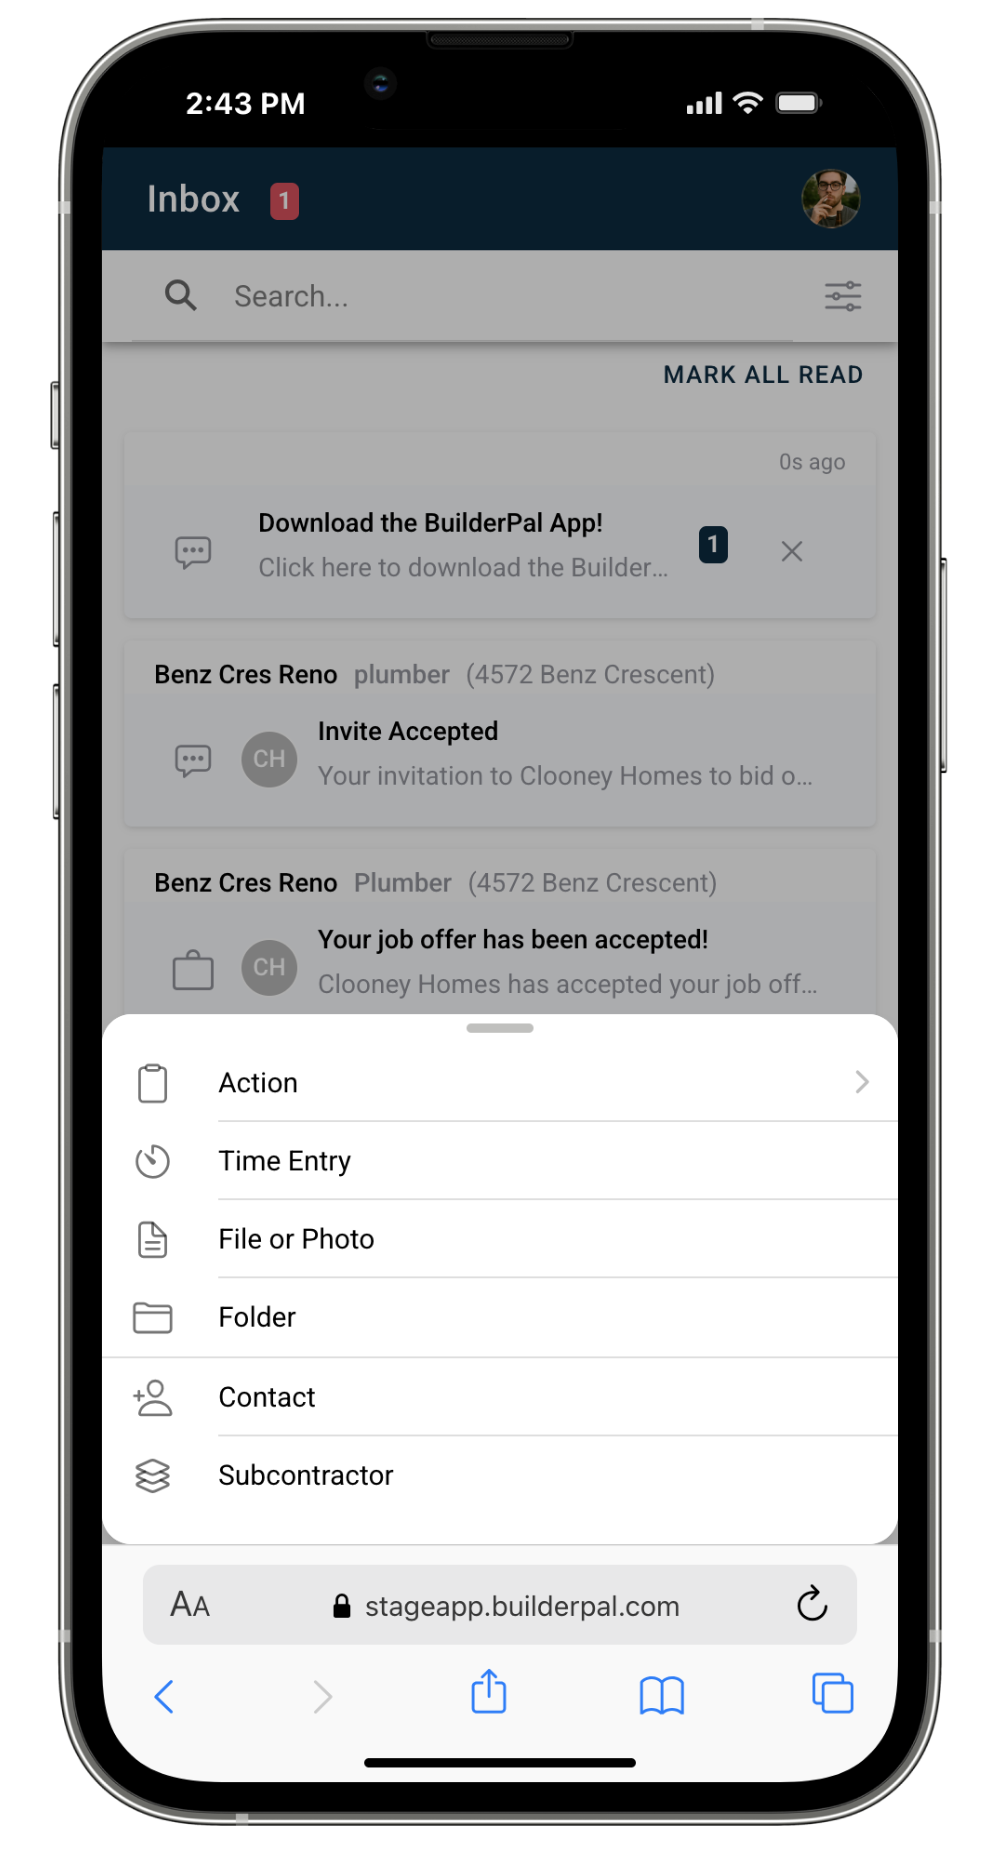
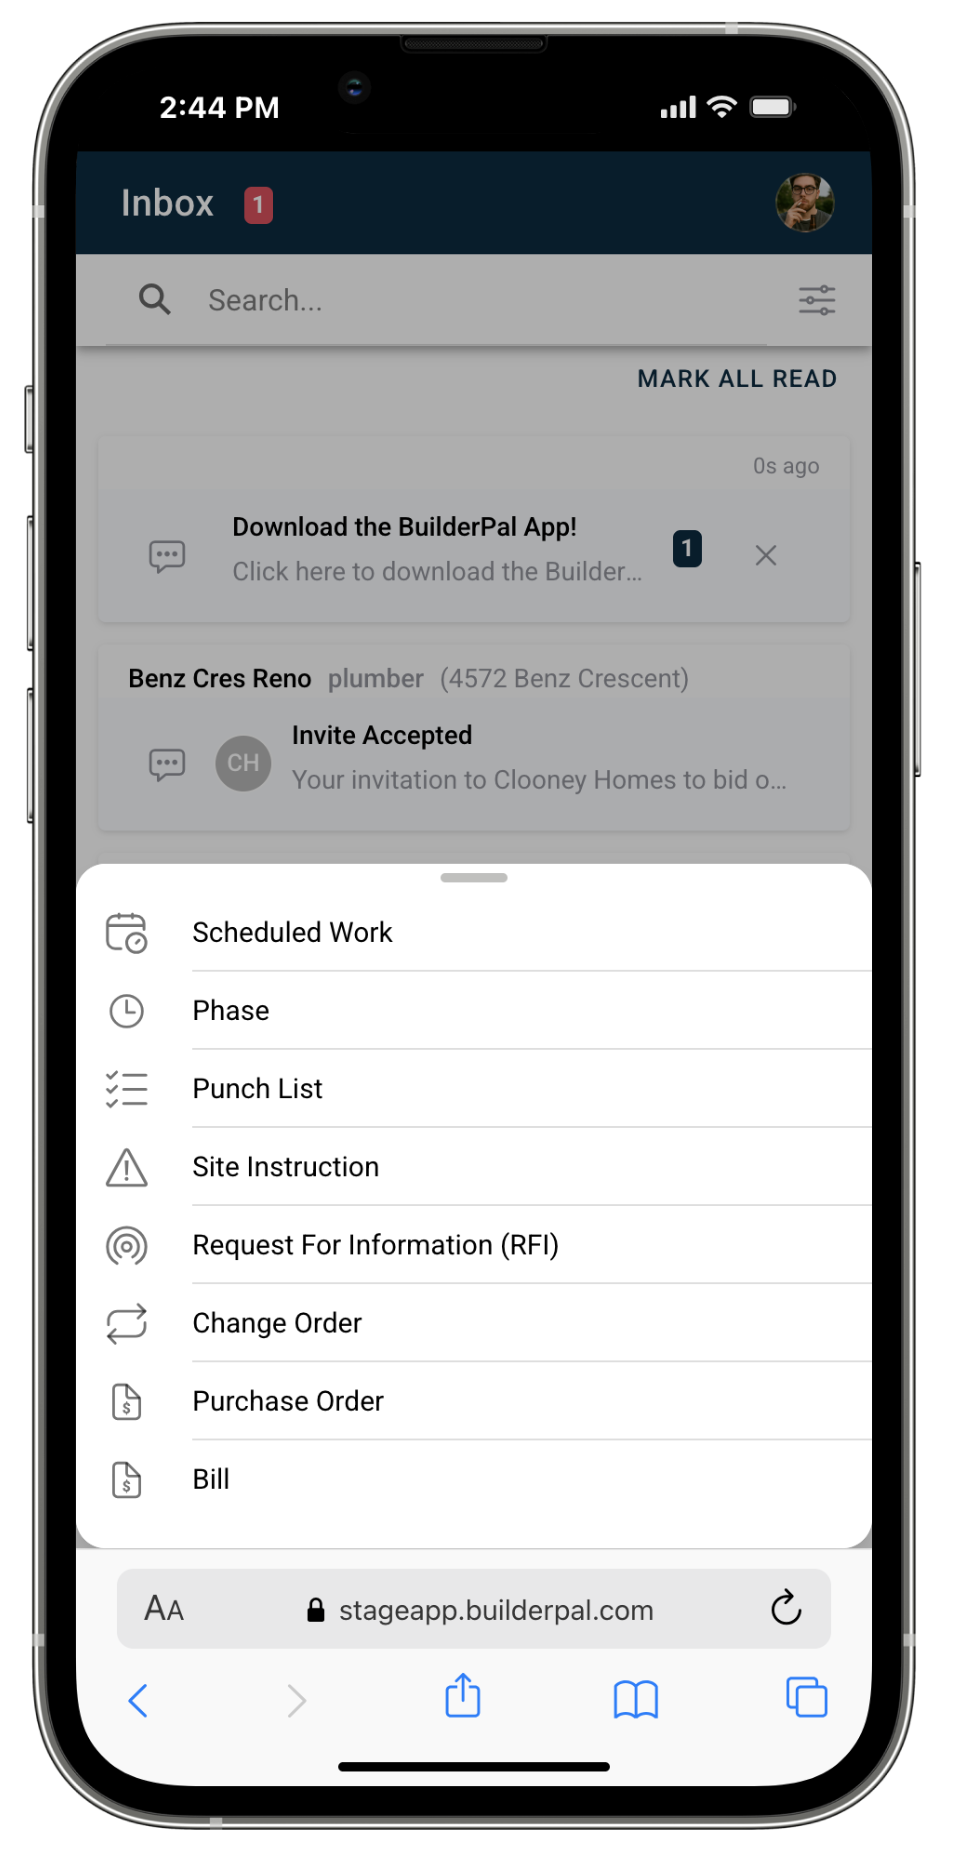
5. Use the + (Quick Actions) Button
When you tap +, you will see creation options such as:
- Action
- Time Entry
- File or Photo
- Folder
- Contact
- Subcontractor
- Scheduled Work
- Phase
- Punch List
- Site Instruction
- Request for Information (RFI)
- Change Order
- Purchase Order
- Bill
6. Use the Menu (Project & Global Tools)
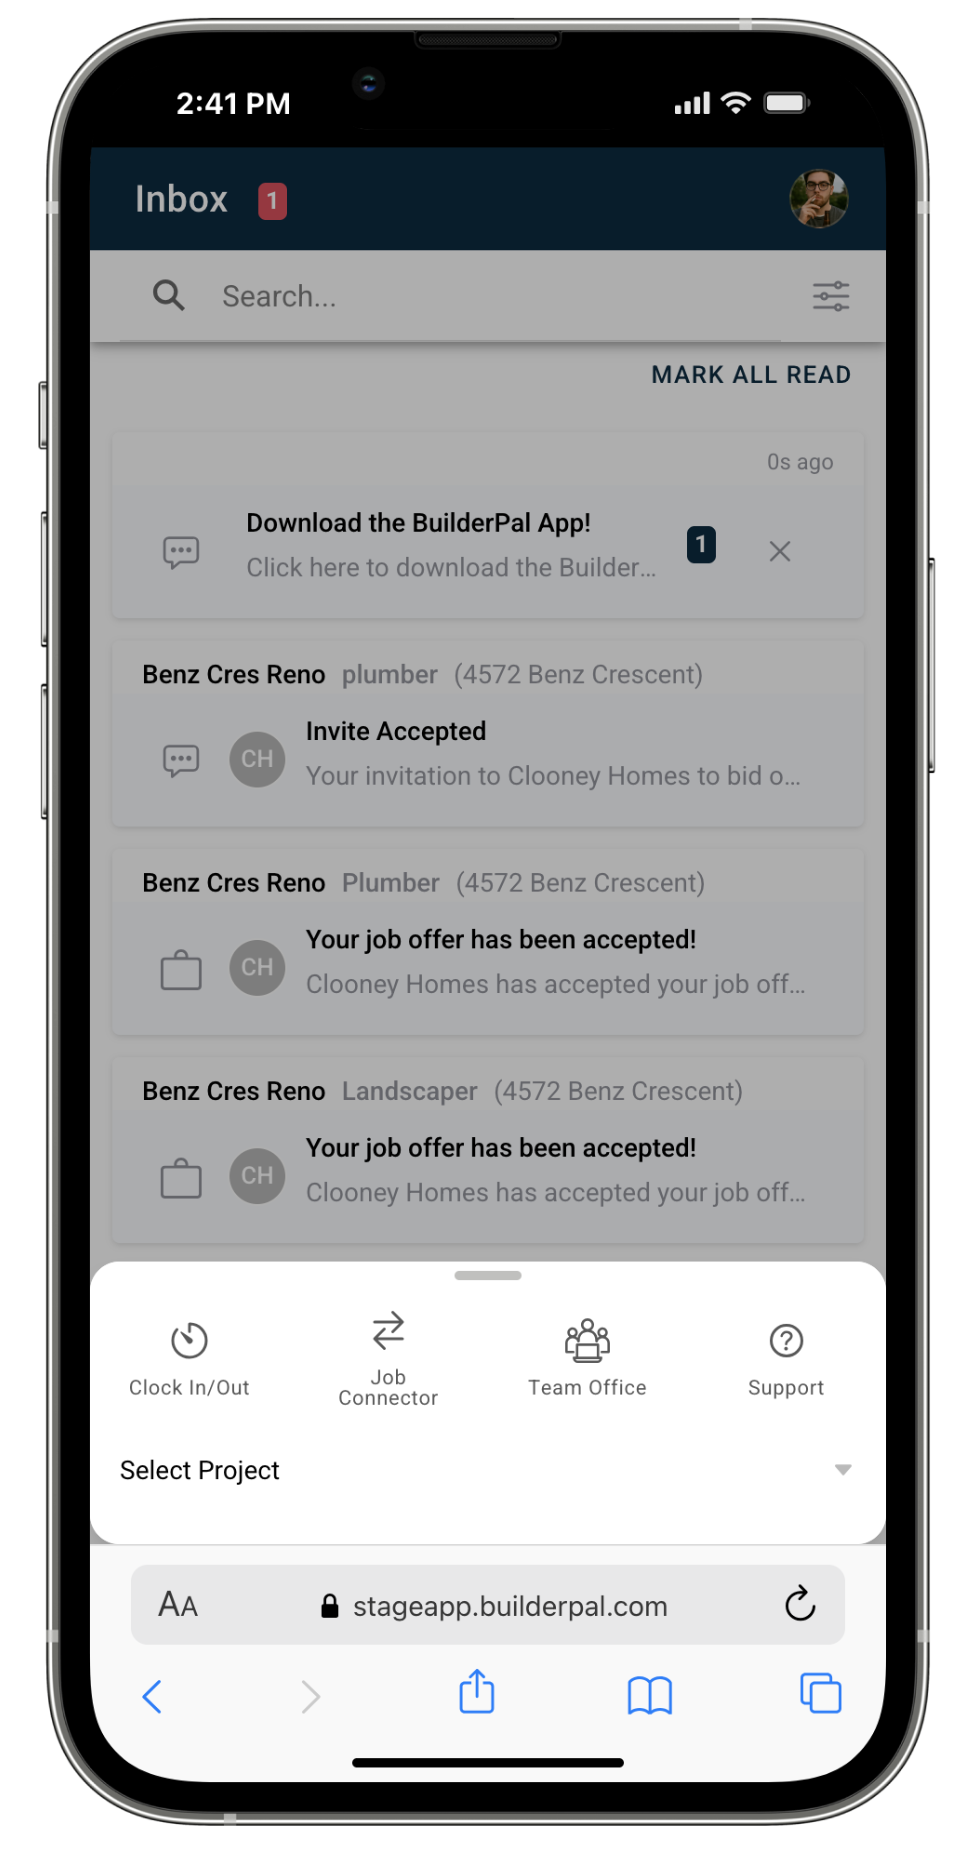
This panel contains:
A. Global Tools (always visible)
- Clock In/Out
- Job Connector
- Team Office
- Support
B. Project Tools (after selecting a project)
If no project is selected, you’ll see Select Project first.
Once a project is selected, you’ll see tools for that project:
- Overview
- Schedule
- Actions
- Documents
- Job Chat
- Participants
- Site Office
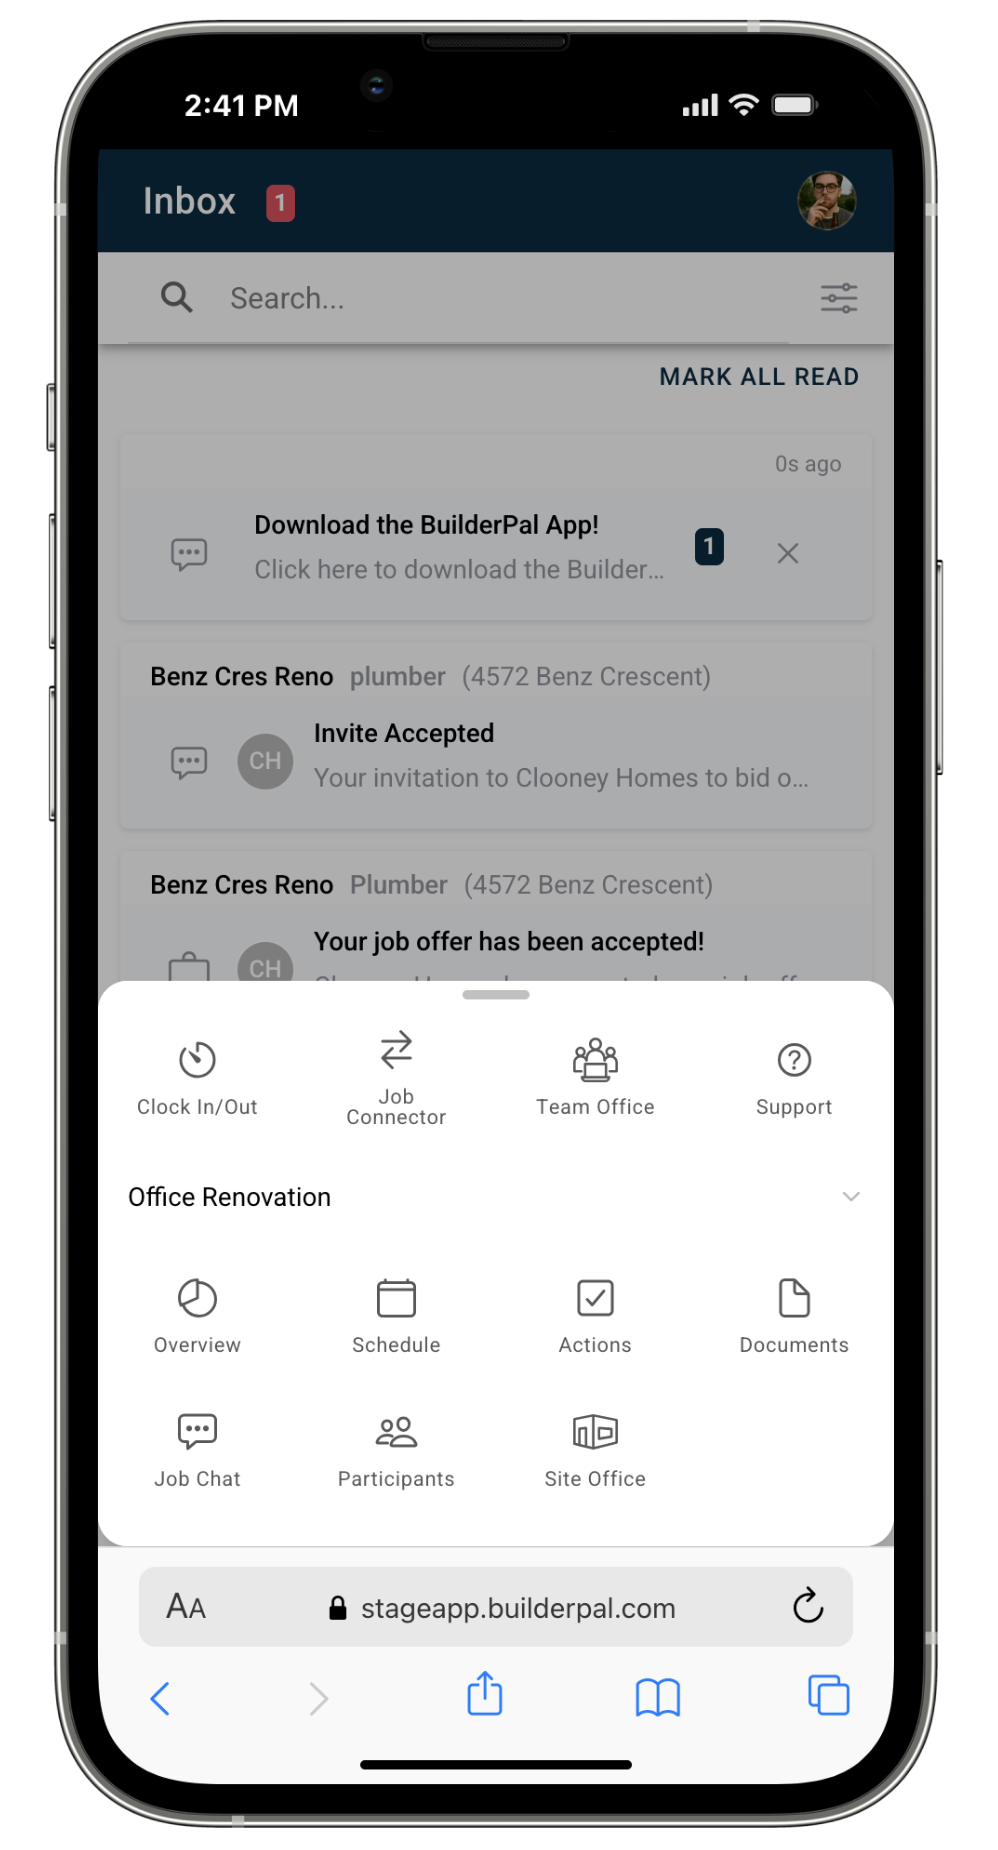
This is where you go to navigate into any part of a project.
7. Accessing User Settings (Profile Icon in the Top Right)
To edit your account details, notifications, or preferences, tap your profile picture in the top-right corner of any screen.
This opens:
- Profile info
- Email & username
- Pro access (if applicable)
- Fast Start Guides
- Notification preferences
- Logout
Account settings are not part of the Menu tab.
Confirmation
You’ll know you understand the app layout when you can easily move between:
- Inbox → Project → Tools
- Projects → Quick Actions → Overview/Actions/Documents/etc.
- Inbox → + → Clock In/Out
- Profile Icon → Account Settings