Subcontractor Guide
- Sign up for BuilderPal
- Navigate the Global & Project Menus
- Download the Mobile App
- Bid on a Job
- Create Your First Project
- Add Phases
- Create & Assign Actions
- Clock In/Out
- Use the Kiosk App
- Upload Files & Photos
- Message in Job Chat
- Team Office and Site Office: What’s the Difference?
- Edit Team Profile
- Create Cost Codes & Divisions
- Create Team Members
Sign up for BuilderPal
Summary
This tutorial guides you through creating a new BuilderPal account, from entering your contact details to setting up basic business information. Signing up is essential for accessing BuilderPal's project management tools, enabling you to manage teams, schedules, and jobs efficiently right from the start.
Prerequisites
- Access to a web browser and internet connection.
- A valid email address or phone number for verification.
- An invitation code.
Steps
-
Go to https://app.builderpal.com/get-started.

-

Enter your email or phone number, then click Continue.
-

Enter your referral code if you have one, then click Continue.
-

Enter the verification code sent to your email or phone.
-

Enter your personal details, agree to the Terms and Conditions and Privacy Policy, then click Next.
-
Enter your business details, then click Next.

-
Select the option that best describes your role and responsibilities, then click Next.

-
Click Next or skip through the feature highlights.

-
Select the areas you service, then click Next.

-

Select your trades, then click Next.
-
Review the Pro subscription options to complete signup.

Confirmation
Check out our Pro Subscription!
FAQ
Q: Can I sign up using a phone number instead of an email?
A: Yes, enter your phone number in the initial field to receive a verification code via SMS.
Q: What happens if I don't agree to the Terms and Conditions?
A: You must agree to the Terms and Conditions and Privacy Policy to click Next and complete the personal details step.
Q: How do I select multiple trades or service areas?
A: In the respective steps, click on multiple options from the list before clicking Next.
Q: What if I need to change my role after selecting it?
A: You can edit your profile later as described in the Edit Personal Profile article.
Related Articles
- Create a Business Profile
- Edit Personal Profile
- Navigating the Global & Project Menus
- Checklists
- Terminology Glossary
Navigate the Global & Project Menus
Summary


The Global and Project Menus in BuilderPal provide quick access to key features and tools. The Global Menu handles account-wide navigation, while the Project Menu focuses on project-specific actions, helping users switch contexts efficiently.
How It Helps
How It Works
When to Use
Screenshots
Next Steps
Once familiar with navigation, explore creating your first project or managing notifications to get started with core features.
FAQ
Q: How do I access the Global Menu from anywhere in the app?
A: The Global Menu is always visible in the top navigation bar. Click the profile icon or menu button to expand it and select options like "My Account" or "Projects."
Q: What if the Project Menu isn't showing?
A: Ensure you're inside a specific project view. If not, navigate to a project from the Global Menu first. If issues persist, check your role permissions in account settings.
Q: Can I customize the menus?
A: Menus are standardized for consistency, but you can adjust preferences like notifications in your account settings to influence what appears in quick access areas.
Related Articles
- Manage Your Account Settings
- Navigate & Organize Your Projects
- Project Setup & Management
- Roles & Permissions Overview
Download the Mobile App
Summary
The BuilderPal mobile app gives you all the power of the desktop platform, optimized for fast, simple, on-site work. You can access your projects, clock in and out, upload photos, communicate with your team, and receive instant notifications — all from your phone.
Whether you're a supervisor, tradesperson, or business owner, you can download the app and sign in using the same email and password you use on desktop.
Prerequisites
- An iOS or Android device
Steps
-
Download for iPhone (iOS) — tap the link or search in the App Store, then install and open.
-
Download for Android — tap the link or search in the Google Play Store, then install and open.
-
Log in using your BuilderPal email and password.
Confirmation
Once logged in, confirm by accessing your projects and features like clocking in/out — the app is ready for use, mirroring desktop functionality optimized for mobile.
FAQ
What if I forget my password?
Reset it via the "Forgot Password" link on the login screen or desktop site.
Is the app available in my region?
BuilderPal app is available worldwide in the App Store and Google Play.
What are the minimum device requirements?
iOS 14 or later for iPhone; Android 8.0 or later.
Why can't I find the app in the store?
Ensure you're searching "BuilderPal" exactly; check your region's store availability or contact support.
Can I use the app without internet?
Some features like viewing cached data work offline, but uploads and updates require connection.
Related Articles
Bid on a Job
Summary
This tutorial guides you through finding available jobs, requesting to bid, and submitting a quote in BuilderPal. Bidding connects subcontractors with general contractors, helping you secure work efficiently while ensuring accurate estimates and clear communication.
Prerequisites
- Have an active BuilderPal account as a subcontractor admin or shortcut admin.
- Set up your service areas and trades in your profile.
- Ensure you have access to the Job Connector page.
Steps
-

Go to the Job Connector page. Navigate to https://app.builderpal.com/job-connector to start browsing opportunities.
-

Search for jobs by location and trade. Click Find Jobs, then select your preferred area and trade to filter listings.
-

Review bid packages and request access. Browse available packages for your trade, check details, and click to request bidding while confirming any listed requirements.
-

Track your bid requests. Switch to the Requests tab in Job Connector to monitor pending approvals.
-

Access approved bids via notifications. Once approved, check your inbox notification, open the bid conversation for details and documents, and message the hiring company if needed.
-



Build your quote. Click Submit Quote, choose trades to bid on, add cost items in the Quote Builder, and apply markup to calculate the owner price.
-
Finalize your estimate. Review and either edit or lock in the estimate to prevent further changes.
-
Submit the quote. Enter your final price manually or upload an estimate file, agree to terms and conditions, then click Submit.
-
Wait for award decision. Your quote is now submitted; monitor notifications for updates on contract award.

Confirmation
You have now successfully bid on a job. You must now wait to be awarded the contract!
FAQ
What if I don't see any bid packages after searching?
Ensure your service areas and trades match the job listings; update your profile if needed, as shown in the setup steps.
Can I edit my quote after submission?
No, but you can remove a submitted quote and then resubmit.
How do I know if my bid request was denied?
Check the Requests tab for status updates, or watch for inbox notifications regarding approvals or denials.
What file types can I upload for estimates?
Common formats like PDF or spreadsheets are supported; ensure they match the bid package requirements reviewed in step 3.
Why can't I message the hiring company before approval?
Access is granted only after bid request approval to maintain structured communication, as per the workflow.
Related Articles
- Filtering & Searching Jobs
- Create a Bid Package
- Review Incoming Bids
- Award or Decline Bids
- Manage Your Service Area
Create Your First Project
Summary
This tutorial guides you through the process of creating your first project in BuilderPal, allowing you to organize work, assign team members, and set visibility options for collaboration.
How-To Video
Prerequisites
- An active BuilderPal account with Admin or equivalent permissions.
- Project details such as name, description, and address ready.
Steps
-
Navigate to https://app.builderpal.com/notifications.

-
Click "Projects".

-
Click "Get started by creating a new project".

-


Enter your project name, fill in the "Description / Project Notes" field, and add participants if needed.
-
Decide if your project is internal or accessible to hired trades, then click "Next".
-

Enter the project address, then click "Create".
Confirmation
Your new project has been created successfully, and you will be redirected to the project dashboard where you can begin adding actions, schedules, or more details.
FAQ
Can I add participants after creating the project?
Yes, you can manage participants at any time from the project settings or participants section.
What does "internal or accessible to hired trades" mean?
Internal projects are visible only to your team; accessible projects allow invited subcontractors or trades to view and collaborate on relevant details.
Is the project address required?
Yes, it helps with geo-features like mapping and clock-in validation, but you can edit it later if needed.
What if I don't have participants to add yet?
Adding participants is optional during creation; you can skip and invite them later via the project dashboard.
Can I create multiple projects at once?
No, projects are created one at a time, but you can quickly repeat the process for additional ones.
Related Articles
- Edit Projects
- Manage Project Participants
- Switch Between Projects
- Get Started with Scheduling & Calendars
- Create & Assign Actions
Add Phases
Summary
This tutorial guides you through creating and publishing phases in BuilderPal to organize your project actions and schedules. Phases help structure complex projects by grouping related tasks, making it easier to track progress and dependencies—essential for efficient project management.
Prerequisites
- You must have an active project created in BuilderPal.
Steps
-


Select Phase from the actions section in the add new dropdown menu. Select "Phase" from the "+ New" dropdown menu in the top right corner.
-


Give your phase a title and set the dates. Enter a descriptive title for the phase and specify the start and end dates using the provided date pickers.
-
Add any additional notes relevant to the phase. Include any extra details, instructions, or context in the notes field to provide more information about the phase.
-
Click Publish. Finalize the phase by clicking the Publish button to make it active in your project.

-

Once published, choose to add new or existing actions to the phase. After publishing, select and add either new actions or existing ones to associate them with the phase for better organization.
-

View your phase in the schedule and actions pages. The phase will now appear in your project's schedule and actions views, helping to organize and visualize related actions.
Confirmation
Your phase appears in the project schedule and actions list, grouping related actions for better visibility and organization.
FAQ
Can I edit a phase after publishing?
Yes, navigate to the phase in your actions or schedule, then update the title, dates, notes, or associated actions as needed.
What happens if I delete a phase?
Deleting a phase removes it from the schedule but does not delete linked actions; they remain as standalone items in the project.
How do phases affect dependencies or predecessors?
Phases group actions visually but do not automatically set dependencies; use the predecessors tool separately to link actions across phases.
Why can't I add a phase to an archived project?
Archived projects are read-only; reactivate the project status first to enable editing or adding phases.
Related Articles
- Get Started with Scheduling & Calendars
- Scheduled Work Actions & Schedules
- Create & Assign Actions
- Predecessors
- Project Schedule
Create & Assign Actions
Summary
This tutorial guides you through creating and assigning actions in BuilderPal, such as scheduled work or other task types. Actions help organize tasks, assign responsibilities, and keep projects on track by notifying team members and integrating with schedules.
How-To Video
Prerequisites
- Access to a project in BuilderPal.
- Team members or subcontractors available for assignment.
Steps
-
Navigate to your project. Go to https://app.builderpal.com/project/

-
Open the New dropdown and select Action. This opens the action creation menu.
-
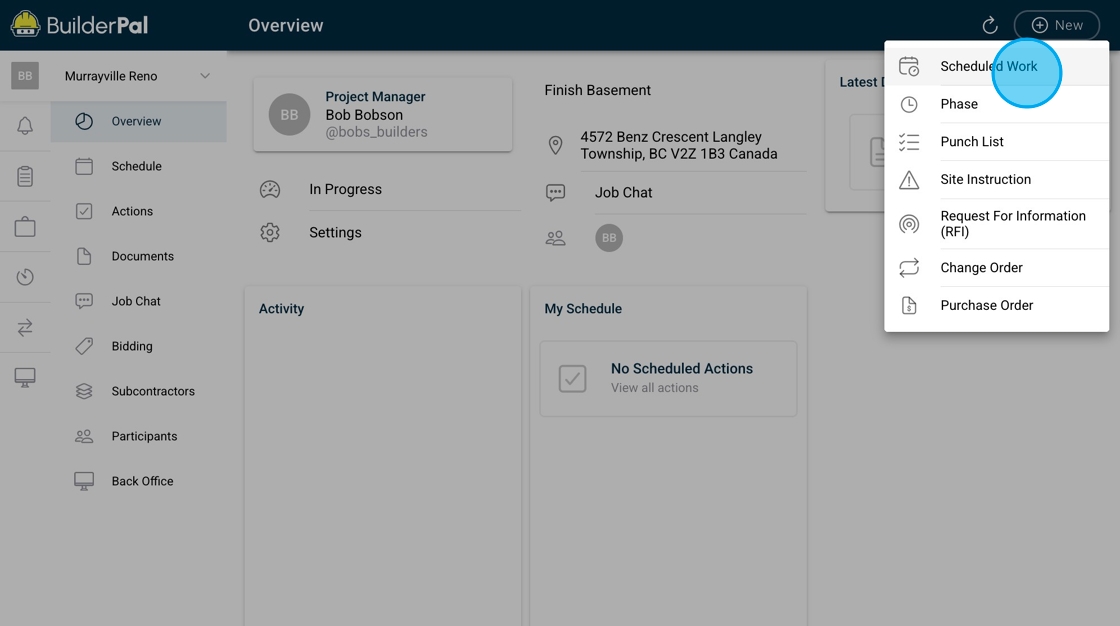
Choose the action type. Select from the list, such as Scheduled Work for time-bound tasks.
-

Enter the title and details. Provide a clear title and any additional information needed for the action.
-

Set dates if applicable. For scheduled work actions, add start and end dates; refer to specific action guides for other types.
-


Assign the action. Click Assign Scheduled Work (or equivalent) to choose a team member or subcontractor.
-
Add participants. Include others who need updates on the action's progress.
-
Publish the action. Click Publish to save and notify assignees.

-

Review and interact. The action appears in the actions page and schedule; add comments or files as needed.
Confirmation
You can now make comments, add files and more! You can also view in your actions page and schedule. The assignee and participants will be notified in their inboxes.
FAQ
Q: Can I assign an action to multiple people?
A: Yes, select multiple assignees during the assignment step, or add participants for updates without primary responsibility.
Q: What happens if I forget to set dates for a scheduled work action?
A: The action will still create, but it won't appear on calendars until dates are added via editing.
Q: How do notifications work for assigned actions?
A: Assignees and participants receive inbox notifications; check the Inbox Feed for updates.
Q: Is there a limit to the number of actions per project?
A: No limit in BuilderPal Free, but organize them effectively using filters on the Actions page.
Q: Can I create custom action types?
A: Currently, use the predefined types; suggest new ones via support for future updates.
Related Articles
- Edit & Delete Actions
- Permissions & Participants in Actions
- Comment on an Action
- Create a Scheduled Work Action
- Actions Page Overview
Clock In/Out
Summary
This tutorial guides you through clocking in and out in BuilderPal to track work hours accurately. Proper time tracking ensures precise payroll, project costing, and compliance, helping teams monitor productivity and manage budgets effectively.
How-To Video
Prerequisites
- Log in to your BuilderPal account.
- Ensure you are assigned to at least one active project.
- For manual time entries, confirm your role permissions allow it (not restricted to Time Clock only).
Steps
-


Access the time tracking page — Navigate to the Clock In-Out section in your menu.

-

Select tracking details — Choose a Project, Cost Code, and optionally an Action to log time against.
-

Start or stop timing — Click Clock In to begin, then Clock Out to pause or end the session.
-
Enter manual time if allowed — If not limited to clock-only mode, click Set to add a manual entry with details.
-
Log time from an action — Inside an action, click the Add dropdown in the top right, select Time Entry, and repeat the selection steps.
Confirmation
Your time entry is recorded and visible in the timesheet, ready for review or approval.
FAQ
What if I forget to clock out?
BuilderPal may auto-pause sessions after inactivity, but check your timesheet to add or edit entries manually if permitted by your role.
Why can't I select a Cost Code?
Cost Codes must be set up in your company settings first; refer to the Create Cost Codes & Divisions article for setup.
Can I add time entries without clocking in real-time?
Yes, if your permissions allow manual entries via the Set button or from within actions.
What does "Time Clock only user" mean?
It restricts users to live clocking without manual edits; see Team Member Permissions for role details.
How do I associate time with a specific Action?
Optionally select an Action during clock-in to link hours directly to tasks for better project tracking.
Related Articles
- Use the Kiosk App
- Filter & Review Time Entries
- Time Report
- Payroll Report
- Use Supervisor Approval
- Create Cost Codes & Divisions
- Role Permissions Explained
Use the Kiosk App
Summary
This tutorial guides you through using the BuilderPal Kiosk App, a Pro feature, to clock in and out, select projects and cost codes, and manage your security pin. It ensures accurate time tracking for teams on the jobsite, streamlining payroll and preventing errors. A BuilderPal Pro subscription is required to access this feature.
Prerequisites
- Have a BuilderPal account with a team member profile set up under a Pro subscription.
- Know your 4-digit security pin (set via your team member profile in the app).
- Access to a device with the Kiosk App enabled for your team.
Steps
-

Open the Kiosk App and select your profile. Launch the BuilderPal Kiosk App on your device and choose your profile from the list to begin.

-

Enter your security pin to log in. Input your 4-digit security pin, configured in your team member profile, to access the app.
-

Clock in and select details. Click Clock In, then select the project, cost code, and optionally an action to start tracking your time.
-
Clock out to end your shift. Log back in with your pin and click Clock Out to stop the timer and record your hours.
-

Change your security pin if needed. Select Change Pin, then enter a new 4-digit pin to secure your profile.
Confirmation
After clocking out, your time entry will appear in the time report under the selected project and cost code, confirming successful tracking.
FAQ
Q: What if my team doesn’t have a Pro subscription?
A: The Kiosk App is exclusive to BuilderPal Pro. Upgrade at https://www.builderpal.com/pro.
Q: What if I forget my security pin?
A: Contact your team admin to reset it via your team member profile in BuilderPal.
Q: Can I clock in without selecting a project?
A: No, the Kiosk App requires a project selection for accurate time tracking.
Q: Does the Kiosk App work offline?
A: Yes, it records time locally and syncs when online, as per Pro time tracking features.
Q: Why don’t I see the Clock In button?
A: Verify your pin and ensure your team’s Pro subscription is active with Kiosk access enabled.
Related Articles
- Clock In/Out
- Use Supervisor Approval
- Filter & Review Time Entries
- Time-tracking & Kiosk App Control Center
- Generate Time Report
Upgrade to BuilderPal Pro for this feature → https://www.builderpal.com/pro
Upload Files & Photos
Summary
This tutorial covers how to upload files and photos directly into your BuilderPal projects from various sources, helping you keep all job-related documents centralized. Effective uploading ensures quick access for your team, streamlines collaboration, and creates a reliable audit trail for progress tracking and compliance.
Prerequisites
- You must have access to an active project in BuilderPal.
- Prepare your files or photos on your device, Google Drive, or Dropbox beforehand.
- No special permissions required beyond your assigned role.
Steps
-

Open the create menu and select upload type. Click the plus button in the bottom center of your screen and select File or Photo from the list of create options.
-

Choose your upload source. Select whether to upload your photo or document from existing project documents, your device, a Google Drive share link, or a Dropbox share link.

-

Confirm the project selection. Ensure the correct project is selected to associate the upload properly.
-
Set sharing options. Choose if you want to share the file with subcontractors and bid packages for broader access.

-
Verify the upload location. Your document is now accessible in your project documents page.

Confirmation
Your document is now accessible in your project documents page.
FAQ
Can I upload files from multiple sources in one session?
No, each upload is handled individually, but you can repeat the process quickly for multiple files.
Why isn't my uploaded file visible to the team?
Check the sharing settings from step 4 and ensure team members have the appropriate permissions as outlined in Document Visibility & Permissions.
What happens if I select the wrong project?
You can edit the file's project association later in the documents page, but selecting correctly during upload saves time.
Are there file size limits for uploads?
BuilderPal supports files up to a reasonable size for construction docs, but very large files may require compression; monitor your account storage in settings.
Can I upload screenshots of my issue into BuilderPal support chat if I need help? In any BuilderPal support chat (or the in-app help chat), just drag & drop your screenshot, or click the paperclip icon and select the image(s). You can upload multiple screenshots at once. This helps our support team see exactly what you’re seeing and solve your issue much faster. (You can also paste images directly with Ctrl+V on desktop.)
Related Articles
Message in Job Chat
Summary
This tutorial covers how to use the Job Chat feature in BuilderPal for team communication within projects. It ensures smooth collaboration, quick updates, and document sharing to keep projects progressing efficiently.
Prerequisites
- You must be assigned to an active project in BuilderPal.
- Access the project via https://app.builderpal.com.
Steps
-
Access Job Chat — Navigate to Job Chat in your project menu at https://app.builderpal.com.

-
Choose a chat channel — Select either the General chat for team-wide discussions or message the project owner directly.

-
Join the conversation — Project participants must send an initial message to join and start receiving notifications.

-
Use project owner chat — The project owner chat provides a direct communication line to the project owner.

-
Respond and attach documents — Reply to messages directly from your inbox and add relevant documents to the chat.
Confirmation
Your message or document appears in the chat thread, and joined participants receive a notification.
FAQ
Q: Why am I not getting notifications for Job Chat?
A: You must send an initial message in the chat to join the conversation and enable notifications.
Q: Can I communicate privately with the project owner?
A: Yes, use the dedicated project owner chat for direct, one-on-one messaging.
Q: How do I attach files to a message?
A: While composing or replying to a message, use the attachment option to add documents directly into the chat.
Q: Who can see messages in the General chat?
A: All project participants who have joined the conversation can view and respond to messages in the General chat.
Related Articles
- Communication Overview
- Messaging in Actions & Bids
- Using Mentions and Tags
- Who Can See My Messages?
- Manage Your Notifications
Team Office and Site Office: What’s the Difference?
Summary
BuilderPal offers two primary workspaces: Team Office for administrative and management tasks, and Site Office for on-site operations. This article explains the key differences to help you choose the right one for your role and tasks.
How It Helps
Team Office streamlines back-office processes, enabling efficient project setup, team coordination, and financial oversight.
Site Office supports field teams by facilitating real-time updates, approvals, and communication, reducing delays and improving productivity on the job site.
Team Office: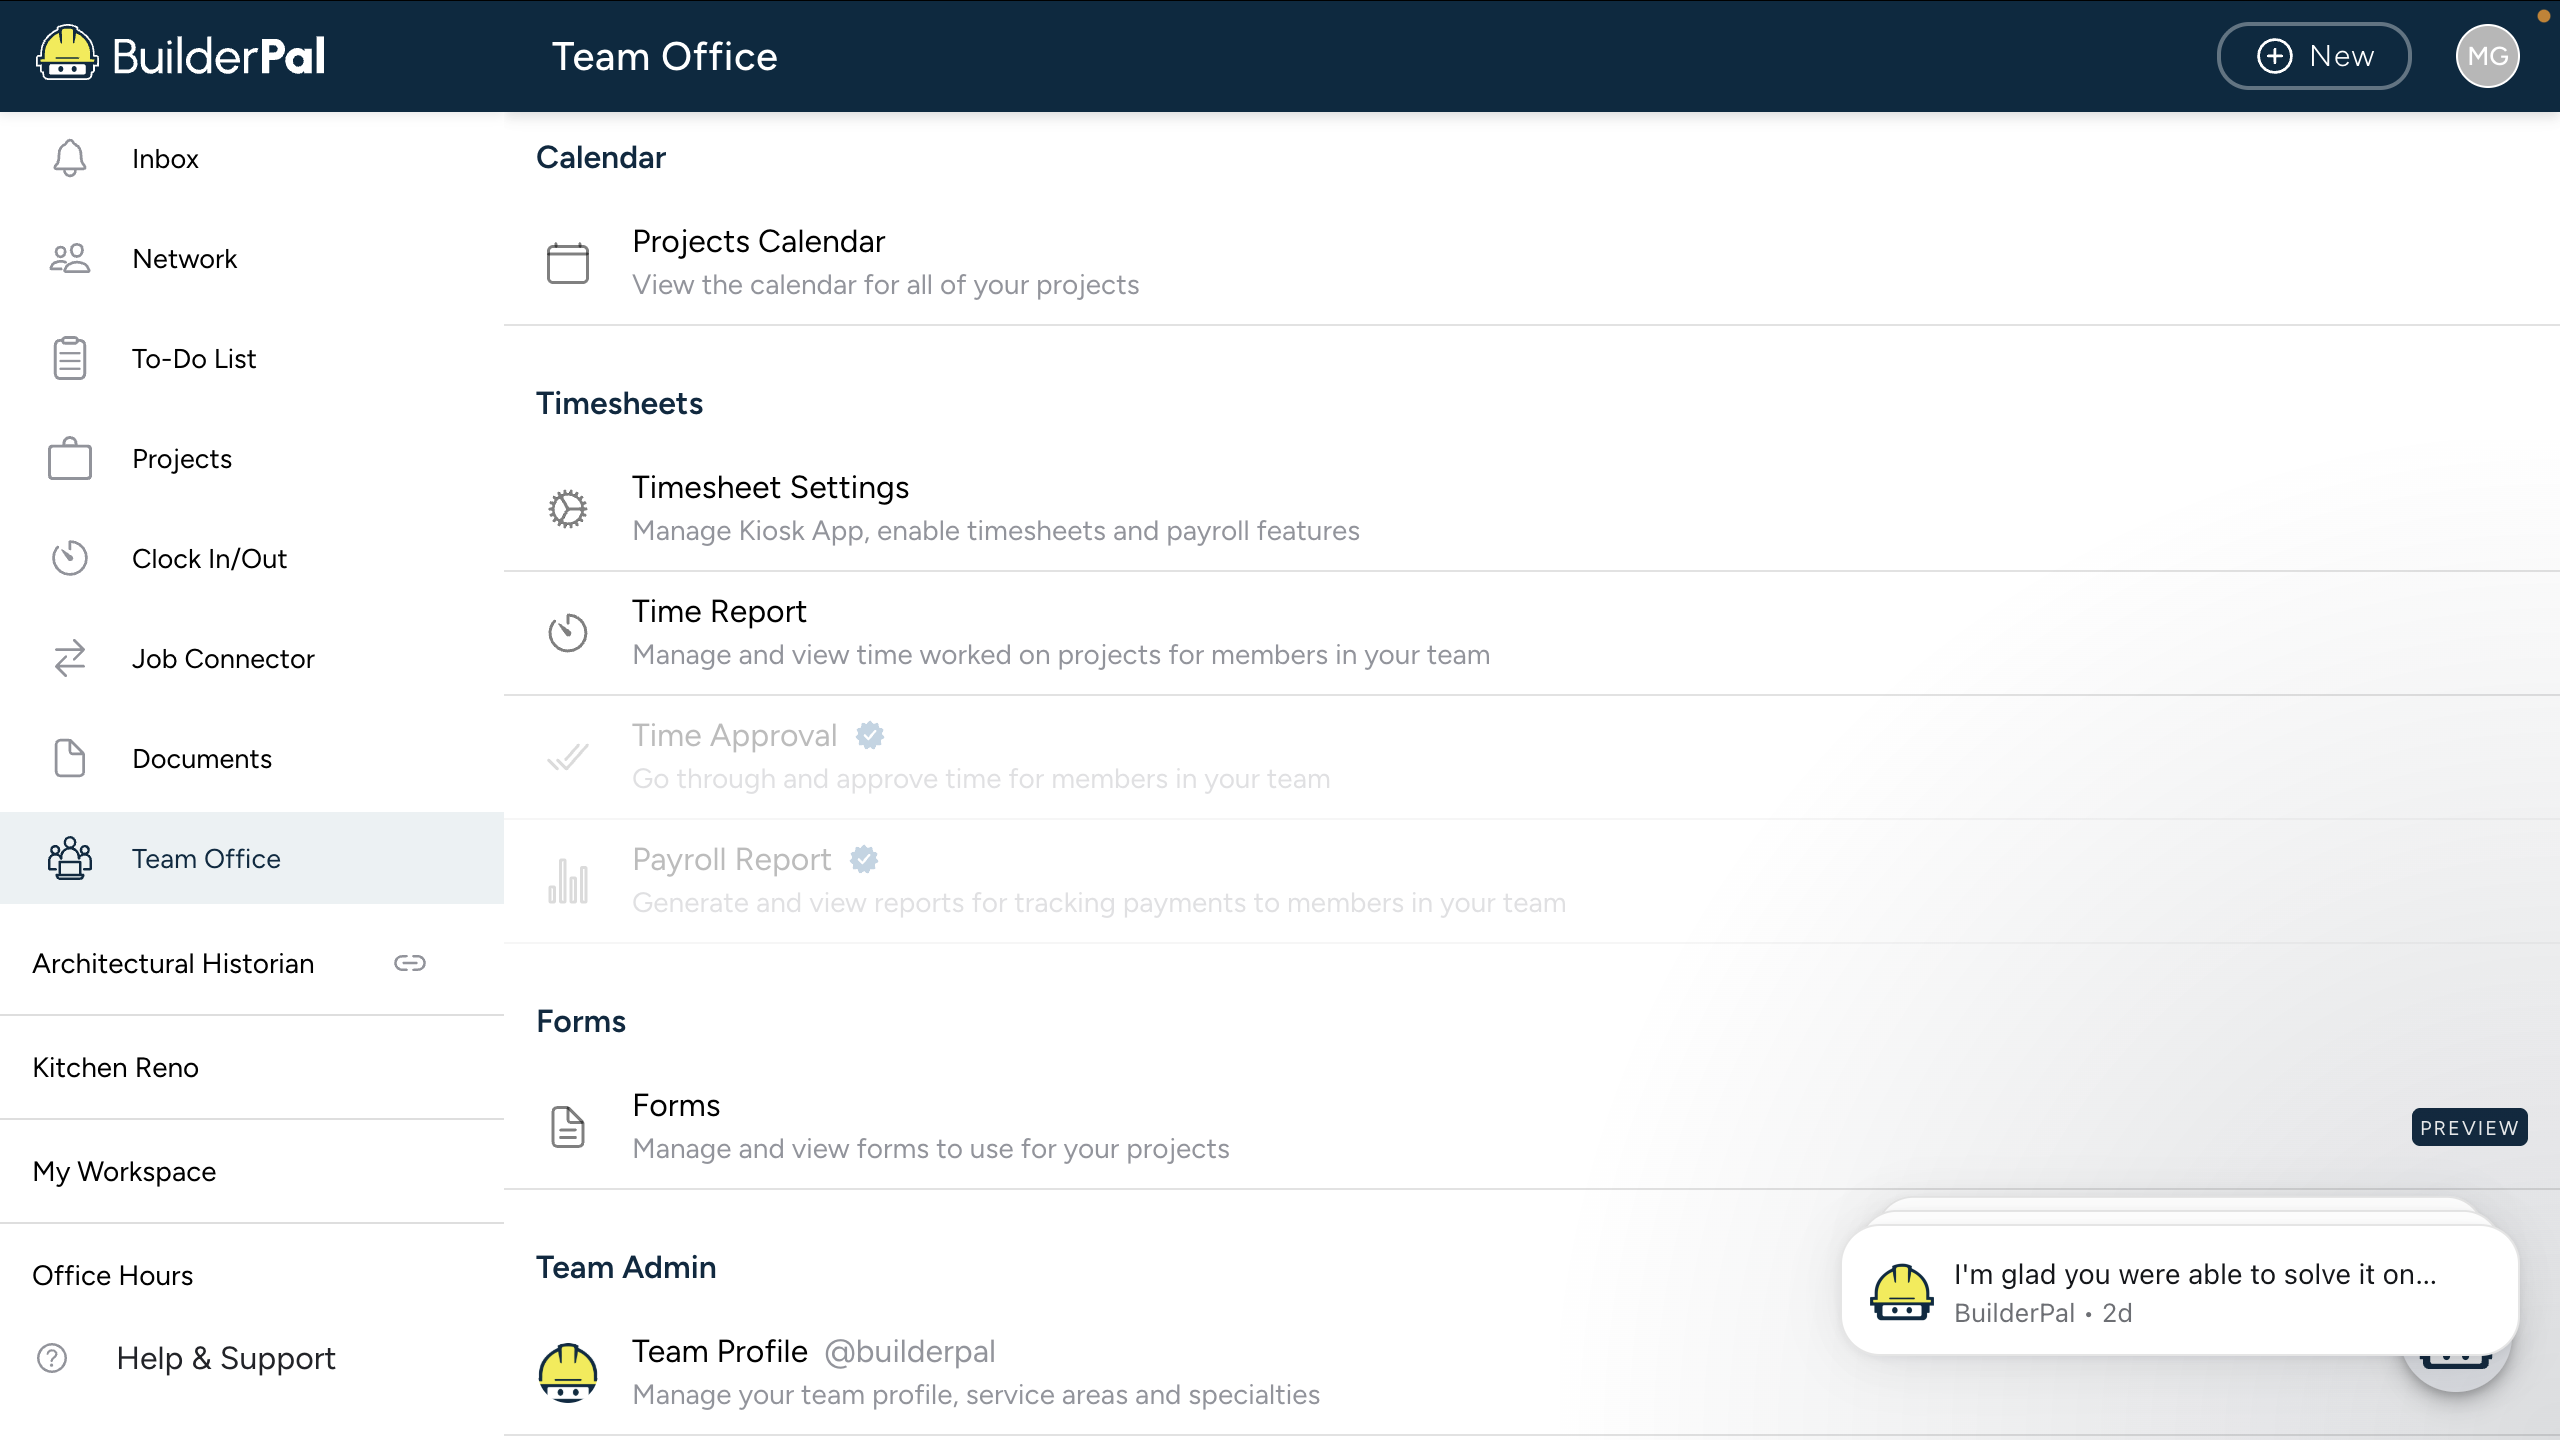
How It Works
Team Office is designed for desktop use, providing tools for comprehensive management like permissions, cost codes, and finance. Site Office is optimized for mobile, focusing on field activities such as time tracking, punch lists, messaging, and uploads. While some features overlap, the interfaces are tailored to the environment—detailed views in Team Office and quick-access actions in Site Office.
When to Use
Use Team Office for office-based tasks like setting up projects, managing teams, or handling finances. Switch to Site Office for field work, including logging time, creating punch lists, or approving uploads on the go. For hybrid features like bid packages or documents, start with Team Office for planning and use Site Office for execution.
Site Office: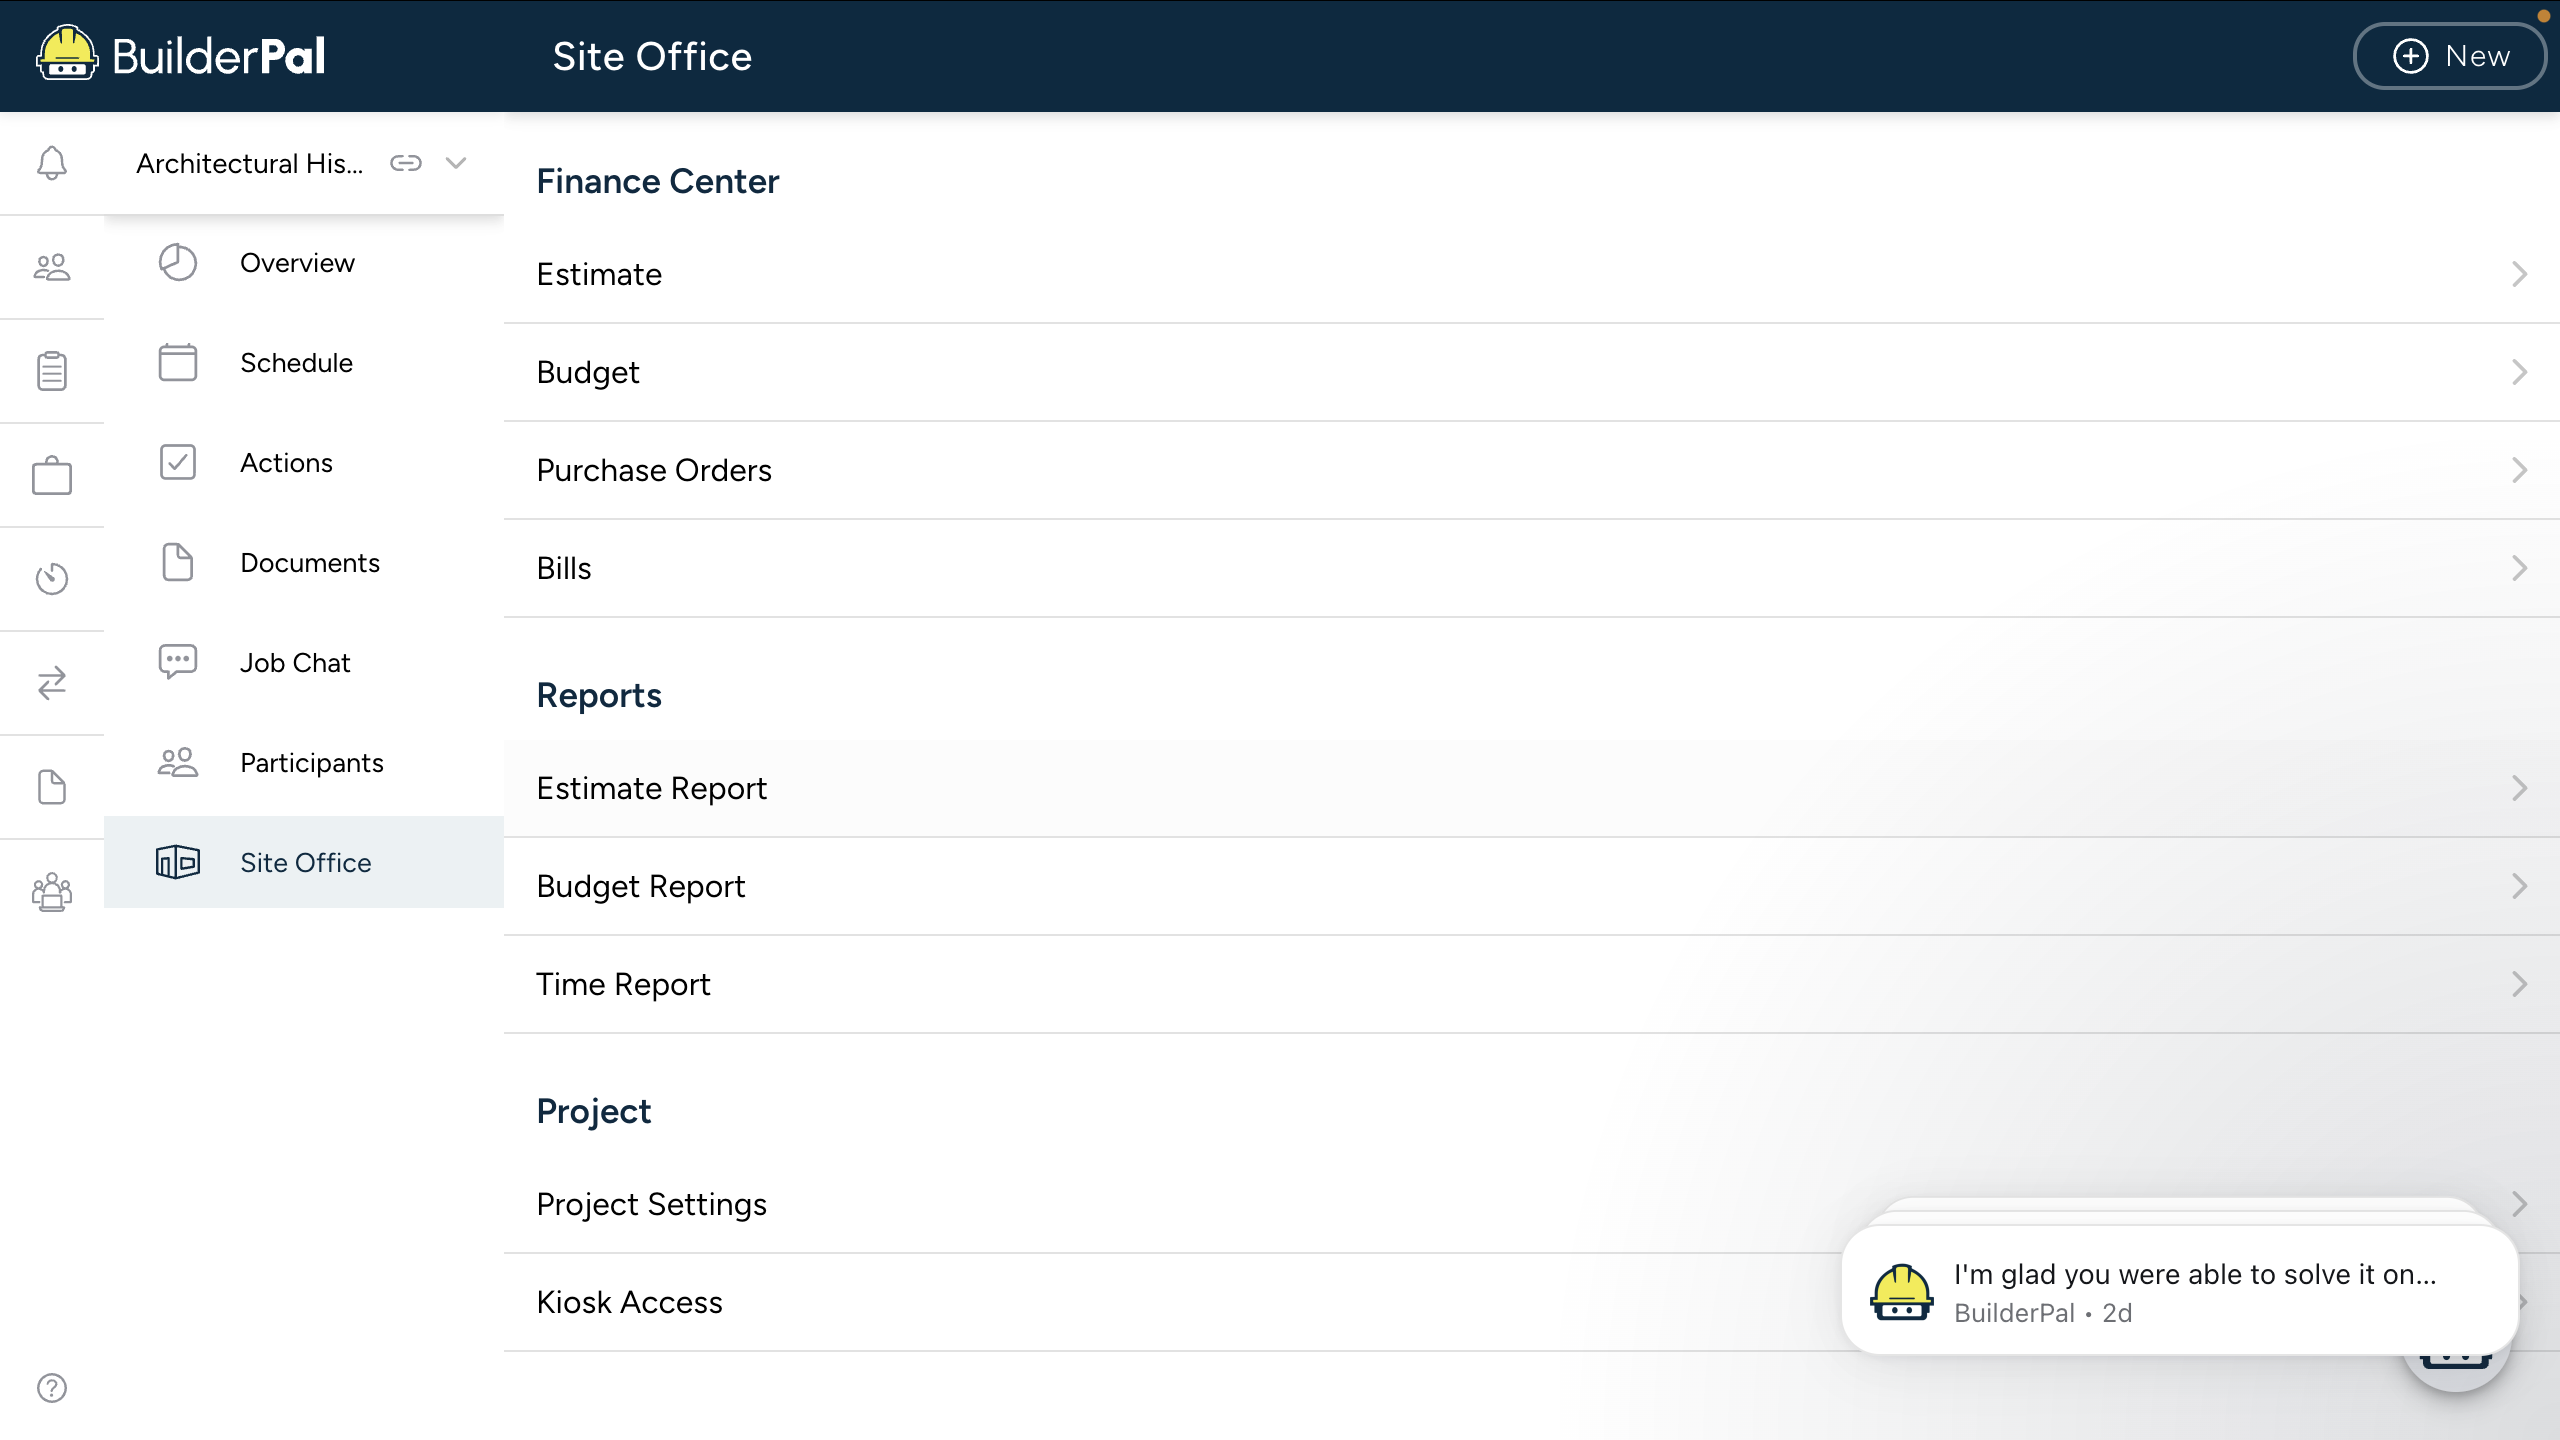
Next Steps
Review your role's permissions and explore the relevant workspace. If needed, follow tutorials on setting up teams or tracking time.
FAQ
What if I need access to both Team Office and Site Office? Most roles have access to both; switch via the app menu based on your current task.
Are there differences in features between the two? Core features are available in both, but Site Office prioritizes mobile-friendly tools for field use, while Team Office offers advanced desktop views for admin tasks.
Can I use Site Office on desktop or Team Office on mobile? Yes, but the experience is optimized as described—mobile for Site Office field tasks and desktop for Team Office management.
How do permissions differ between Team Office and Site Office? Permissions are role-based across both, but Site Office may limit advanced edits to ensure quick field operations.
What happens if workflows differ between mobile and desktop? For hybrid features, refer to specific tutorials; differences are minimal but noted where relevant.
Related Articles
Edit Team Profile
Summary
This tutorial guides you through editing your team profile in BuilderPal, including updating company details, adding service areas, uploading images, and showcasing a portfolio. Keeping your profile current helps attract better job matches, improves team visibility, and ensures accurate contact information for collaborations.
Prerequisites
- You must be logged in to your BuilderPal account at https://app.builderpal.com.
- Have admin or managerial access to the team profile.
- Prepare any images or portfolio items you want to upload in advance.
Steps
-

Go to the Company Back Office and click your team profile at the top of the My Team section to open it.
-

Click Edit in the top right corner, then update your team name, handle, overview, slogan, address, and contact details as needed.
-
Click Save to apply your changes to the profile details.

-

Click Add service areas, then select custom locations or use the recommended list to define your work availability.
-

Click the camera icon on the profile image to upload a new profile picture or team banner from your device.
-

Scroll to the portfolio section and add details or images of completed projects to highlight your work.
Confirmation
Your team profile updates will appear immediately in the Company Back Office and on public views like Job Connector listings. Refresh the page to confirm changes, such as the new name, images, or service areas displaying correctly.
FAQ
Why can't I see the Edit button on my team profile?
You need admin-level access (like Admin (GC) or Team Project Manager). If it's missing, contact your team admin to adjust your permissions via the Team Members settings.
What happens if I change my team handle?
The handle updates your unique URL slug (e.g., @yournewhandle), but existing links may break. Notify connected users or subs, as it's visible in invitations and bids.
Can I add multiple service areas?
Yes, select as many as needed during setup or edits. This improves job matching in Job Connector but doesn't restrict project creation outside those areas.
How do I remove a portfolio item after adding it?
Click the edit icon next to the item in the portfolio section, then select delete. Confirm the action to remove it permanently from your profile.
Is there a file size limit for profile images or banners?
Uploads are limited to 5MB per image. Use JPEG or PNG formats for best results; larger files may fail to upload.
Related Articles
- Sign up for BuilderPal
- Create a Business Profile
- Manage Your Service Area
- Edit Personal Profile
- Manage Contacts
- Create Team Members
Create Cost Codes & Divisions
Summary
This tutorial guides you through setting up cost codes and divisions in BuilderPal, essential for organizing financial tracking, budgeting, and time entries in projects. Proper setup ensures accurate cost allocation, reporting, and compliance across your team.
Prerequisites
- Access to the Company Back Office as an admin or finance role.
- Basic understanding of your company's cost structure.
Steps
-
Navigate to the Manage Cost Codes and Divisions page in your team office.

-

Click the plus button in the top right corner and select Add Division.
-

Enter the division code, display name, and description.
-

Click Select a Sector to browse and choose from a pre-loaded list of divisions if needed.
-
Click Save to add the division.

-

Select Add Cost Code from the plus button dropdown in the top right corner.

-
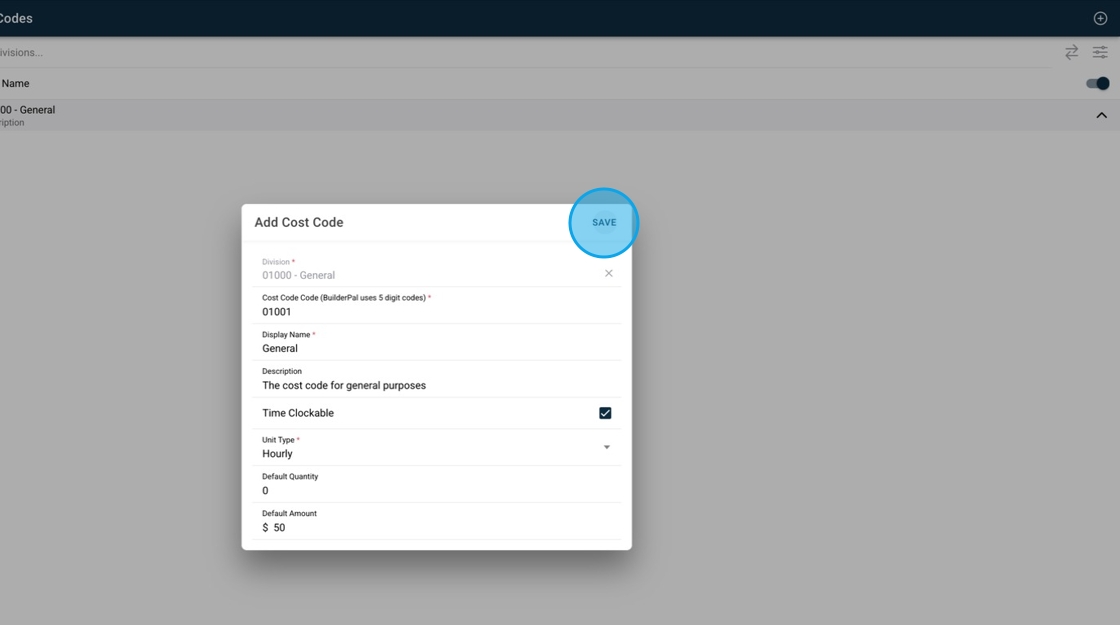
Enter the cost code details, including code, display name, description, time clockable status, unit type, default quantity, default amount, and associated division.
-
Click Save to add the cost code.
-


Click Import divisions and cost codes as an alternative setup option.
-

Choose to import custom cost codes or BuilderPal's default set.
-
Click Import to complete the setup.
Confirmation
The new divisions and cost codes appear in the list on the Manage Cost Codes and Divisions page, ready for use in time entries, budgets, and reports.
FAQ
Q: Can I edit a cost code after saving it?
A: Yes, click the edit icon next to the cost code in the list to update details like description or time clockable status.
Q: What happens if I import BuilderPal's defaults?
A: It populates standard divisions and codes based on common construction categories, which you can customize further.
Q: Why can't I see the import option?
A: Ensure you have admin or finance role access; if not visible, check your permissions in team settings.
Q: Are cost codes required for time tracking?
A: Yes, they help categorize hours accurately for reporting and budgeting in projects.
Q: How do divisions group cost codes?
A: Divisions act as categories (e.g., Electrical), organizing related cost codes for easier management and filtering.
Related Articles
- Manage Taxes & Fees
- Generate Payroll Report
- Time-tracking & Kiosk App Control Center
- Edit Company Profile
- Create Team Members
Create Team Members
Summary
This tutorial guides you through adding new team members to your BuilderPal account, either individually or by importing multiple at once. Adding team members is essential for collaborating on projects, assigning roles, and managing permissions effectively within your construction team.
How-To Video
Prerequisites
- You must have admin access or appropriate permissions to manage team members.
- Prepare team member details like name, email, phone, and desired roles/groups in advance.
Steps
-

Navigate to the Team Members page in https://app.builderpal.com.
-

Select Create Team Member from the dropdown menu.
-

Fill out the new team member's information, including name, email, and phone.
-
Assign groups and permissions, then click Save.

-
Click Save to confirm and add the new team member.

-
To import multiple team members, select Import Team Members from the dropdown.

-
Select Import Team Members from the dropdown menu.

-
Write a message describing the team members you want to add, or upload a file with their info.

-
Optionally, upload a file containing team member details instead of typing a description.

-
Review and assign roles, verify information, then save the imported team members.

Confirmation
The new team member(s) appear in the Team Members list, with an invitation email sent if applicable, and they can now access assigned projects based on their roles and permissions.
FAQ
Q: What if I don't assign a group or permission during creation?
A: You can edit the team member's details later from the Team Members page to add or adjust groups and permissions.
Q: Can I import team members without a file?
A: Yes, by writing a descriptive message in the import field, BuilderPal will parse the details to pre-fill the information for review.
Q: Why isn't the new team member receiving an invitation email?
A: Ensure the email address is correct and check spam folders; invitations are sent automatically upon saving.
Q: How do I remove a team member after adding them?
A: From the Team Members page, select the member and choose the delete or deactivate option, as covered in related articles like Manage Team Member Permissions.
Q: Are there limits on how many team members I can add?
A: No limits on the free plan, but large imports may take longer to process; for bulk additions, use the file upload for efficiency.
Related Articles
- Manage Team Member Permissions
- Create Groups
- Edit Company Profile
- Manage Contacts
- Time-tracking & Kiosk App Control Center