Team Member Guide
- Login as Team Member
- Edit Personal Profile
- Navigate the Global & Project Menus
- Add Phases
- Create & Assign Actions
- Clock In/Out
- Use the Kiosk App
- Upload Files & Photos
- Message in Job Chat
Login as Team Member
Summary
Team Members don’t create their own accounts in BuilderPal. Instead, their Admin creates the account for them and BuilderPal automatically emails the login credentials (email + temporary password) to the Admin. The Admin then forwards those details to the Team Member.
This guide shows Team Members how to log in for the first time on both web and mobile — the process is identical on both platforms.
Prerequisites
- The login email your Admin forwarded to you
- The temporary password from that email
- Internet connection
If you didn’t receive the email, ask your Admin to forward or resend it.
Steps
-
Open BuilderPal — On web, go to https://app.builderpal.com. On mobile, open the BuilderPal app.
-
Enter your login email — Type or paste the email address your Admin provided into the Email field.
-
Enter temporary password — Paste the temporary password from the email into the Password field.
-
Log in — Click or tap Log In.
You will immediately be prompted to create a new password for security. -
Create a new password — Choose a secure, memorable password and save it. Your account is now fully activated.
Confirmation
After setting your new password, you will land on the BuilderPal dashboard and can start using the platform right away.
FAQ
I didn’t receive the login email. What should I do?
Contact your Admin — they received the original email and can forward it or resend the invitation.
Are the login steps different on mobile vs. web?
No — the process is exactly the same on both platforms.
What if I forget my new password later?
Use the Forgot password? link on the login screen to reset it via email.
Related Articles
- Edit Personal Profile
- Navigate the Global & Project Menus
- Clock In/Out
- Upload Files & Photos
- Message in Job Chat
Edit Personal Profile
Summary
This tutorial guides you through updating your personal profile in BuilderPal, including your contact details, password, and profile picture. Keeping your profile current ensures smooth communication and accurate team interactions on projects.
Prerequisites
- You must be logged into your BuilderPal account.
- Applicable to all user roles with access to account settings.
Steps
-
Navigate to your My Account page.
Access the settings menu and select the option to view or edit your personal account details.
-
Update your personal information.
Edit fields such as your name, email address, and phone number as needed, then save the changes.
-
Change your account password.
Enter your current password, then input your new password twice to confirm and apply the update.
-
Add or update your profile picture.
Click on the profile picture area to upload a new image from your device files, then confirm to complete the setup.
Confirmation
Your personal profile is now fully set up. You'll see the updated details reflected immediately in your account, and any changes like email or phone will be used for notifications and team visibility.
FAQ
Q: What happens if I enter the wrong current password when changing it?
A: The system will prompt an error and require you to re-enter the correct current password before proceeding; no changes will be saved until verified.
Q: Can I upload any image file for my profile picture?
A: Supported formats include common image types like JPEG and PNG; ensure the file is appropriately sized to avoid upload issues.
Q: Do email or phone changes require additional verification?
A: Yes, BuilderPal may send a verification code to the new email or phone to confirm the update for security.
Q: How often should I update my profile information?
A: Update it whenever your contact details change or to add a profile picture for better team recognition on projects.
Q: Is editing my profile visible to other team members?
A: Basic info like name and picture is visible to your team, but sensitive details like email are private unless shared explicitly.
Related Articles
Navigate the Global & Project Menus
Summary
The Global and Project Menus in BuilderPal provide quick access to key features and tools. The Global Menu handles account-wide navigation, while the Project Menu focuses on project-specific actions, helping users switch contexts efficiently.
How It Helps
How It Works
When to Use
Screenshots


Next Steps
Once familiar with navigation, explore creating your first project or managing notifications to get started with core features.
FAQ
Q: How do I access the Global Menu from anywhere in the app?
A: The Global Menu is always visible in the top navigation bar. Click the profile icon or menu button to expand it and select options like "My Account" or "Projects."
Q: What if the Project Menu isn't showing?
A: Ensure you're inside a specific project view. If not, navigate to a project from the Global Menu first. If issues persist, check your role permissions in account settings.
Q: Can I customize the menus?
A: Menus are standardized for consistency, but you can adjust preferences like notifications in your account settings to influence what appears in quick access areas.
Related Articles
- Manage Your Account Settings
- Navigate & Organize Your Projects
- Project Setup & Management
- Roles & Permissions Overview
Add Phases
Summary
This tutorial guides you through creating and publishing phases in BuilderPal to organize your project actions and schedules. Phases help structure complex projects by grouping related tasks, making it easier to track progress and dependencies—essential for efficient project management.
Prerequisites
- You must have an active project created in BuilderPal.
Steps
-

Select Phase from the actions section in the add new dropdown menu. Select "Phase" from the "+ New" dropdown menu in the top right corner.
-

Give your phase a title and set the dates. Enter a descriptive title for the phase and specify the start and end dates using the provided date pickers.
-

Add any additional notes relevant to the phase. Include any extra details, instructions, or context in the notes field to provide more information about the phase.
-
Click Publish. Finalize the phase by clicking the Publish button to make it active in your project.

-

Once published, choose to add new or existing actions to the phase. After publishing, select and add either new actions or existing ones to associate them with the phase for better organization.
-

View your phase in the schedule and actions pages. The phase will now appear in your project's schedule and actions views, helping to organize and visualize related actions.
Confirmation
Your phase appears in the project schedule and actions list, grouping related actions for better visibility and organization.
FAQ
Can I edit a phase after publishing?
Yes, navigate to the phase in your actions or schedule, then update the title, dates, notes, or associated actions as needed.
What happens if I delete a phase?
Deleting a phase removes it from the schedule but does not delete linked actions; they remain as standalone items in the project.
How do phases affect dependencies or predecessors?
Phases group actions visually but do not automatically set dependencies; use the predecessors tool separately to link actions across phases.
Why can't I add a phase to an archived project?
Archived projects are read-only; reactivate the project status first to enable editing or adding phases.
Related Articles
- Get Started with Scheduling & Calendars
- Scheduled Work Actions & Schedules
- Create & Assign Actions
- Predecessors
- Project Schedule
Create & Assign Actions
Summary
This tutorial guides you through creating and assigning actions in BuilderPal, such as scheduled work or other task types. Actions help organize tasks, assign responsibilities, and keep projects on track by notifying team members and integrating with schedules.
How-To Video
Prerequisites
- Access to a project in BuilderPal.
- Team members or subcontractors available for assignment.
Steps
-
Navigate to your project. Go to https://app.builderpal.com/project/

-

Open the New dropdown and select Action. This opens the action creation menu.
-
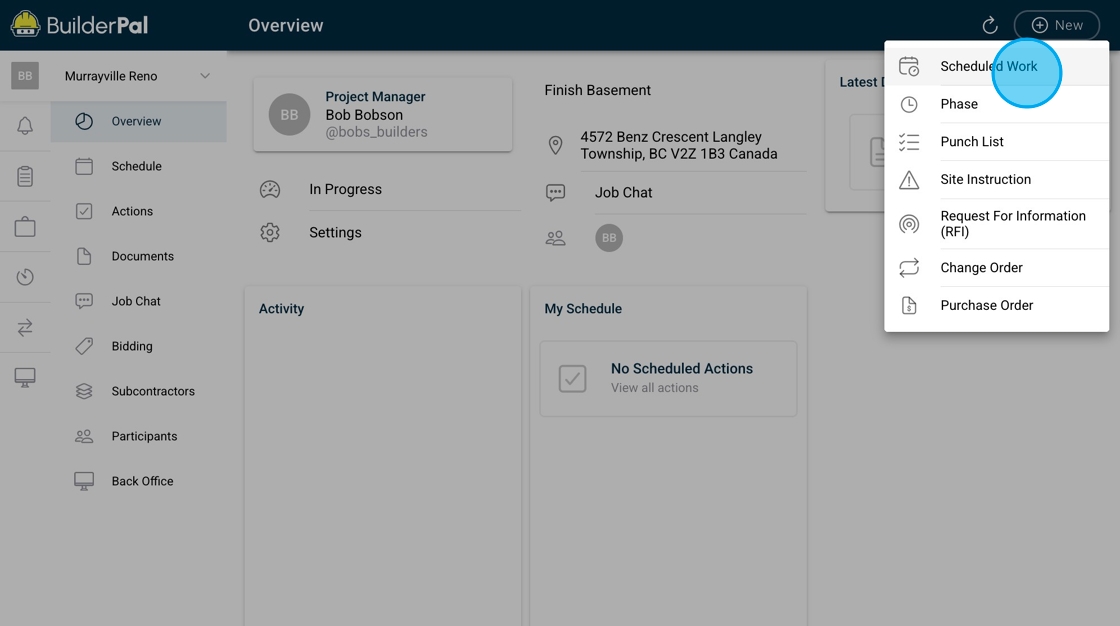
Choose the action type. Select from the list, such as Scheduled Work for time-bound tasks.
-


Enter the title and details. Provide a clear title and any additional information needed for the action.
-
Set dates if applicable. For scheduled work actions, add start and end dates; refer to specific action guides for other types.
-

Assign the action. Click Assign Scheduled Work (or equivalent) to choose a team member or subcontractor.
-

Add participants. Include others who need updates on the action's progress.
-
Publish the action. Click Publish to save and notify assignees.

-

Review and interact. The action appears in the actions page and schedule; add comments or files as needed.
Confirmation
You can now make comments, add files and more! You can also view in your actions page and schedule. The assignee and participants will be notified in their inboxes.
FAQ
Q: Can I assign an action to multiple people?
A: Yes, select multiple assignees during the assignment step, or add participants for updates without primary responsibility.
Q: What happens if I forget to set dates for a scheduled work action?
A: The action will still create, but it won't appear on calendars until dates are added via editing.
Q: How do notifications work for assigned actions?
A: Assignees and participants receive inbox notifications; check the Inbox Feed for updates.
Q: Is there a limit to the number of actions per project?
A: No limit in BuilderPal Free, but organize them effectively using filters on the Actions page.
Q: Can I create custom action types?
A: Currently, use the predefined types; suggest new ones via support for future updates.
Related Articles
- Edit & Delete Actions
- Permissions & Participants in Actions
- Comment on an Action
- Create a Scheduled Work Action
- Actions Page Overview
Clock In/Out
Summary
This tutorial guides you through clocking in and out in BuilderPal to track work hours accurately. Proper time tracking ensures precise payroll, project costing, and compliance, helping teams monitor productivity and manage budgets effectively.
How-To Video
Prerequisites
- Log in to your BuilderPal account.
- Ensure you are assigned to at least one active project.
- For manual time entries, confirm your role permissions allow it (not restricted to Time Clock only).
Steps
-

Access the time tracking page — Navigate to the Clock In-Out section in your menu.

-
Select tracking details — Choose a Project, Cost Code, and optionally an Action to log time against.
-

Start or stop timing — Click Clock In to begin, then Clock Out to pause or end the session.
-

Enter manual time if allowed — If not limited to clock-only mode, click Set to add a manual entry with details.
-

Log time from an action — Inside an action, click the Add dropdown in the top right, select Time Entry, and repeat the selection steps.
Confirmation
Your time entry is recorded and visible in the timesheet, ready for review or approval.
FAQ
What if I forget to clock out?
BuilderPal may auto-pause sessions after inactivity, but check your timesheet to add or edit entries manually if permitted by your role.
Why can't I select a Cost Code?
Cost Codes must be set up in your company settings first; refer to the Create Cost Codes & Divisions article for setup.
Can I add time entries without clocking in real-time?
Yes, if your permissions allow manual entries via the Set button or from within actions.
What does "Time Clock only user" mean?
It restricts users to live clocking without manual edits; see Team Member Permissions for role details.
How do I associate time with a specific Action?
Optionally select an Action during clock-in to link hours directly to tasks for better project tracking.
Related Articles
- Use the Kiosk App
- Filter & Review Time Entries
- Time Report
- Payroll Report
- Use Supervisor Approval
- Create Cost Codes & Divisions
- Role Permissions Explained
Use the Kiosk App
Summary
This tutorial guides you through using the BuilderPal Kiosk App, a Pro feature, to clock in and out, select projects and cost codes, and manage your security pin. It ensures accurate time tracking for teams on the jobsite, streamlining payroll and preventing errors. A BuilderPal Pro subscription is required to access this feature.
Prerequisites
- Have a BuilderPal account with a team member profile set up under a Pro subscription.
- Know your 4-digit security pin (set via your team member profile in the app).
- Access to a device with the Kiosk App enabled for your team.
Steps
-

Open the Kiosk App and select your profile. Launch the BuilderPal Kiosk App on your device and choose your profile from the list to begin.

-

Enter your security pin to log in. Input your 4-digit security pin, configured in your team member profile, to access the app.
-

Clock in and select details. Click Clock In, then select the project, cost code, and optionally an action to start tracking your time.
-
Clock out to end your shift. Log back in with your pin and click Clock Out to stop the timer and record your hours.
-

Change your security pin if needed. Select Change Pin, then enter a new 4-digit pin to secure your profile.
Confirmation
After clocking out, your time entry will appear in the time report under the selected project and cost code, confirming successful tracking.
FAQ
Q: What if my team doesn’t have a Pro subscription?
A: The Kiosk App is exclusive to BuilderPal Pro. Upgrade at https://www.builderpal.com/pro.
Q: What if I forget my security pin?
A: Contact your team admin to reset it via your team member profile in BuilderPal.
Q: Can I clock in without selecting a project?
A: No, the Kiosk App requires a project selection for accurate time tracking.
Q: Does the Kiosk App work offline?
A: Yes, it records time locally and syncs when online, as per Pro time tracking features.
Q: Why don’t I see the Clock In button?
A: Verify your pin and ensure your team’s Pro subscription is active with Kiosk access enabled.
Related Articles
- Clock In/Out
- Use Supervisor Approval
- Filter & Review Time Entries
- Time-tracking & Kiosk App Control Center
- Generate Time Report
Upgrade to BuilderPal Pro for this feature → https://www.builderpal.com/pro
Upload Files & Photos
Summary
This tutorial covers how to upload files and photos directly into your BuilderPal projects from various sources, helping you keep all job-related documents centralized. Effective uploading ensures quick access for your team, streamlines collaboration, and creates a reliable audit trail for progress tracking and compliance.
Prerequisites
- You must have access to an active project in BuilderPal.
- Prepare your files or photos on your device, Google Drive, or Dropbox beforehand.
- No special permissions required beyond your assigned role.
Steps
-

Open the create menu and select upload type. Click the plus button in the bottom center of your screen and select File or Photo from the list of create options.
-
Choose your upload source. Select whether to upload your photo or document from existing project documents, your device, a Google Drive share link, or a Dropbox share link.

-

Confirm the project selection. Ensure the correct project is selected to associate the upload properly.
-

Set sharing options. Choose if you want to share the file with subcontractors and bid packages for broader access.
-

Verify the upload location. Your document is now accessible in your project documents page.
Confirmation
Your document is now accessible in your project documents page.
FAQ
Can I upload files from multiple sources in one session?
No, each upload is handled individually, but you can repeat the process quickly for multiple files.
Why isn't my uploaded file visible to the team?
Check the sharing settings from step 4 and ensure team members have the appropriate permissions as outlined in Document Visibility & Permissions.
What happens if I select the wrong project?
You can edit the file's project association later in the documents page, but selecting correctly during upload saves time.
Are there file size limits for uploads?
BuilderPal supports files up to a reasonable size for construction docs, but very large files may require compression; monitor your account storage in settings.
Can I upload screenshots of my issue into BuilderPal support chat if I need help? In any BuilderPal support chat (or the in-app help chat), just drag & drop your screenshot, or click the paperclip icon and select the image(s). You can upload multiple screenshots at once. This helps our support team see exactly what you’re seeing and solve your issue much faster. (You can also paste images directly with Ctrl+V on desktop.)
Related Articles
Message in Job Chat
Summary
This tutorial covers how to use the Job Chat feature in BuilderPal for team communication within projects. It ensures smooth collaboration, quick updates, and document sharing to keep projects progressing efficiently.
Prerequisites
- You must be assigned to an active project in BuilderPal.
- Access the project via https://app.builderpal.com.
Steps
-
Access Job Chat — Navigate to Job Chat in your project menu at https://app.builderpal.com.

-


Choose a chat channel — Select either the General chat for team-wide discussions or message the project owner directly.

-
Join the conversation — Project participants must send an initial message to join and start receiving notifications.
-
Use project owner chat — The project owner chat provides a direct communication line to the project owner.
-

Respond and attach documents — Reply to messages directly from your inbox and add relevant documents to the chat.
Confirmation
Your message or document appears in the chat thread, and joined participants receive a notification.
FAQ
Q: Why am I not getting notifications for Job Chat?
A: You must send an initial message in the chat to join the conversation and enable notifications.
Q: Can I communicate privately with the project owner?
A: Yes, use the dedicated project owner chat for direct, one-on-one messaging.
Q: How do I attach files to a message?
A: While composing or replying to a message, use the attachment option to add documents directly into the chat.
Q: Who can see messages in the General chat?
A: All project participants who have joined the conversation can view and respond to messages in the General chat.
Related Articles
- Communication Overview
- Messaging in Actions & Bids
- Using Mentions and Tags
- Who Can See My Messages?
- Manage Your Notifications